
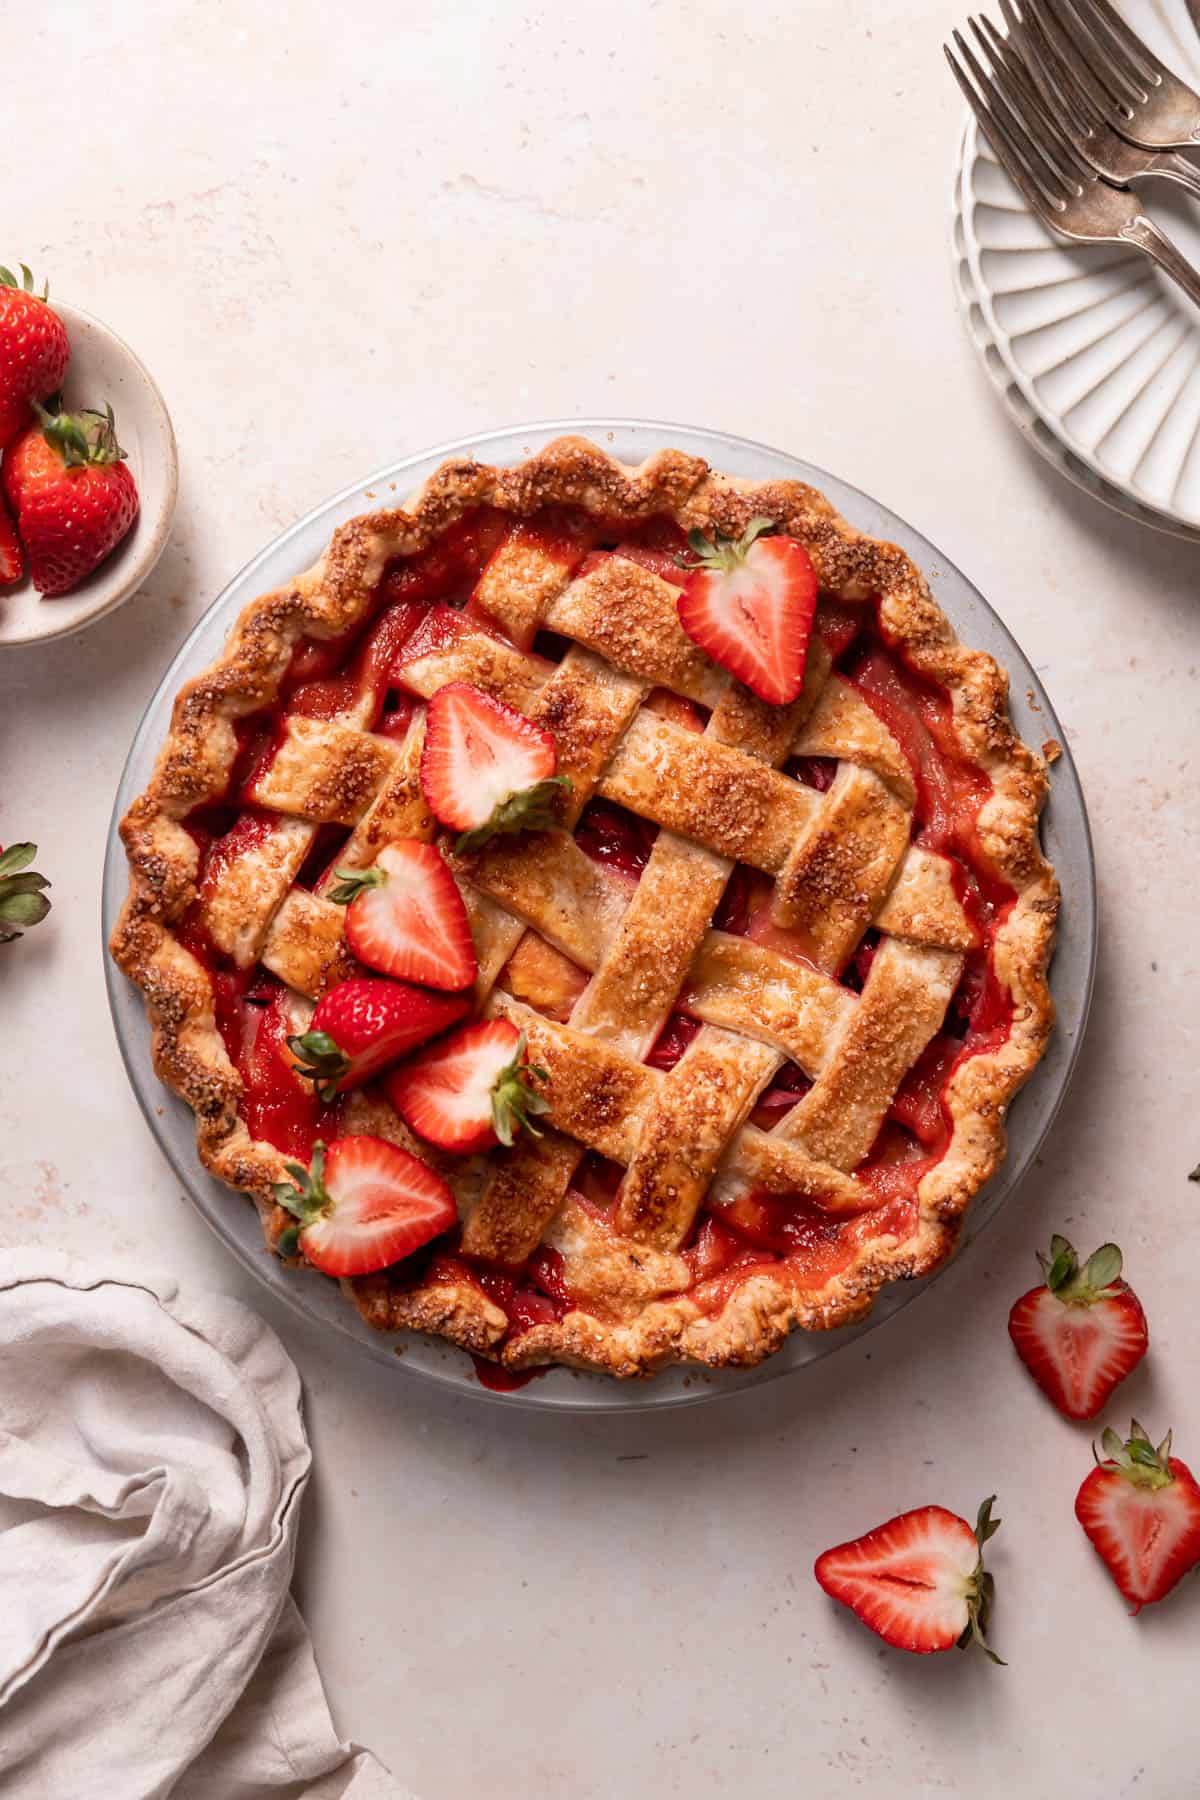
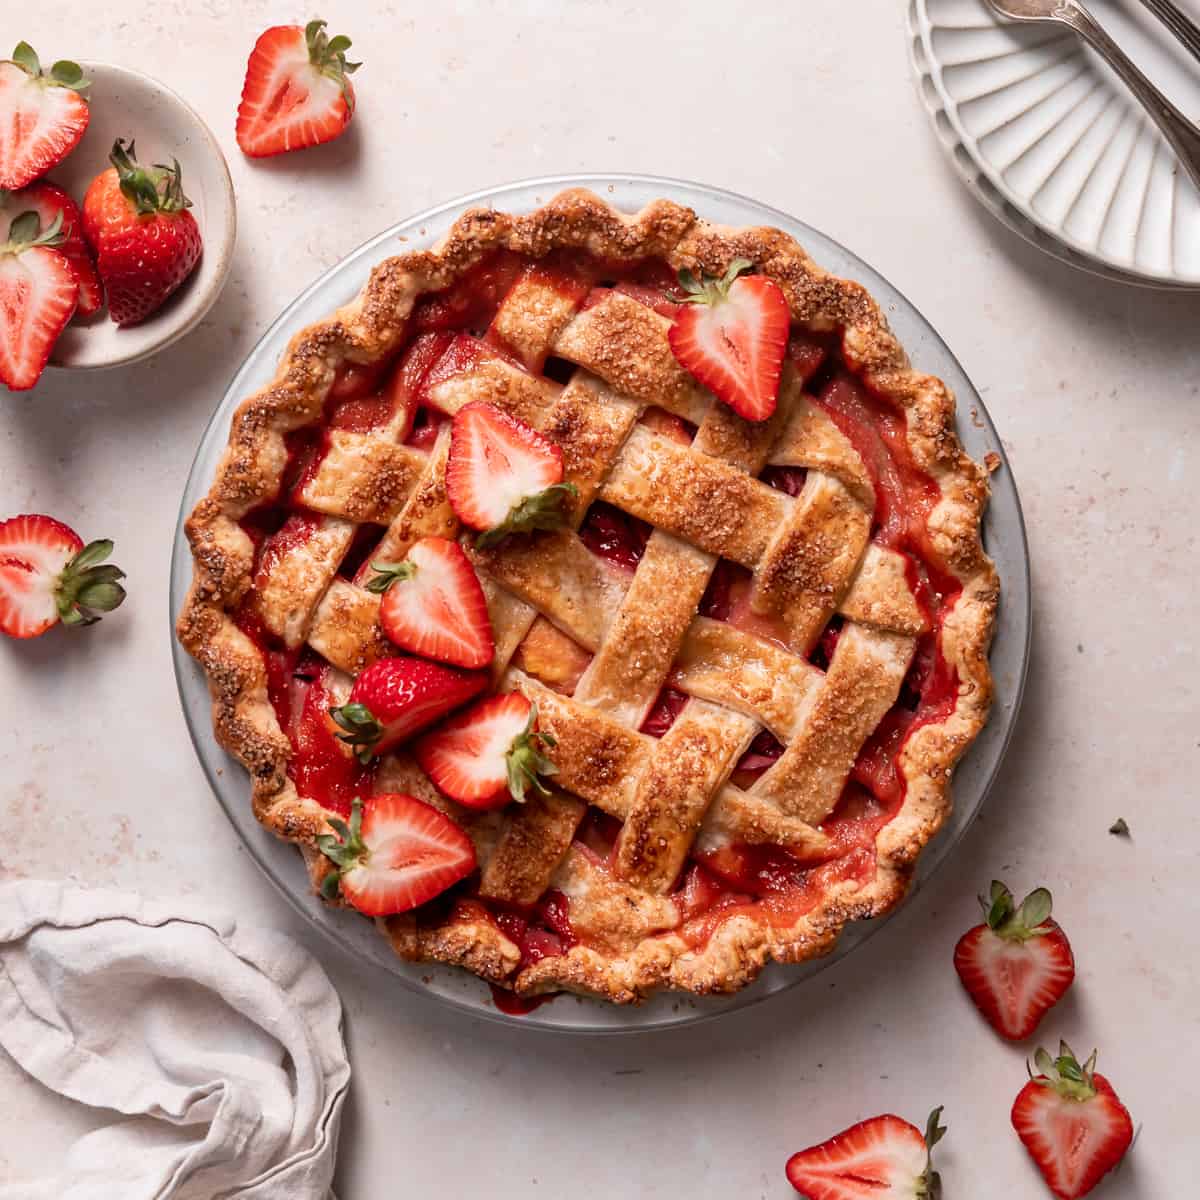
Strawberry peach pie– fresh, juicy peaches and strawberries encased in a buttery brown butter crust. Serve with a scoop of vanilla ice cream, and enjoy it all summer long!
Working as a pastry chef, I’ve baked and assembled thousands of pies- aside from the holidays, they are the perfect dessert for summer barbeques and birthdays!
For an elevated twist, this strawberry peach pie is made with a brown butter pie crust for a rich, nutty flavor and then filled with fresh strawberries and peaches. It’s the perfect treat to serve a crowd and tastes even better than from a bakery. If you don’t need a whole pie, try my strawberry pie pop tarts instead!
This pie is a summertime staple at my house, but when I don’t feel like rolling out dough, I’ll go for my triple berry crumb bars instead. All the fruit and brown butter goodness, no pie crust required!
Table of Contents
Ingredient Notes and Substitutions
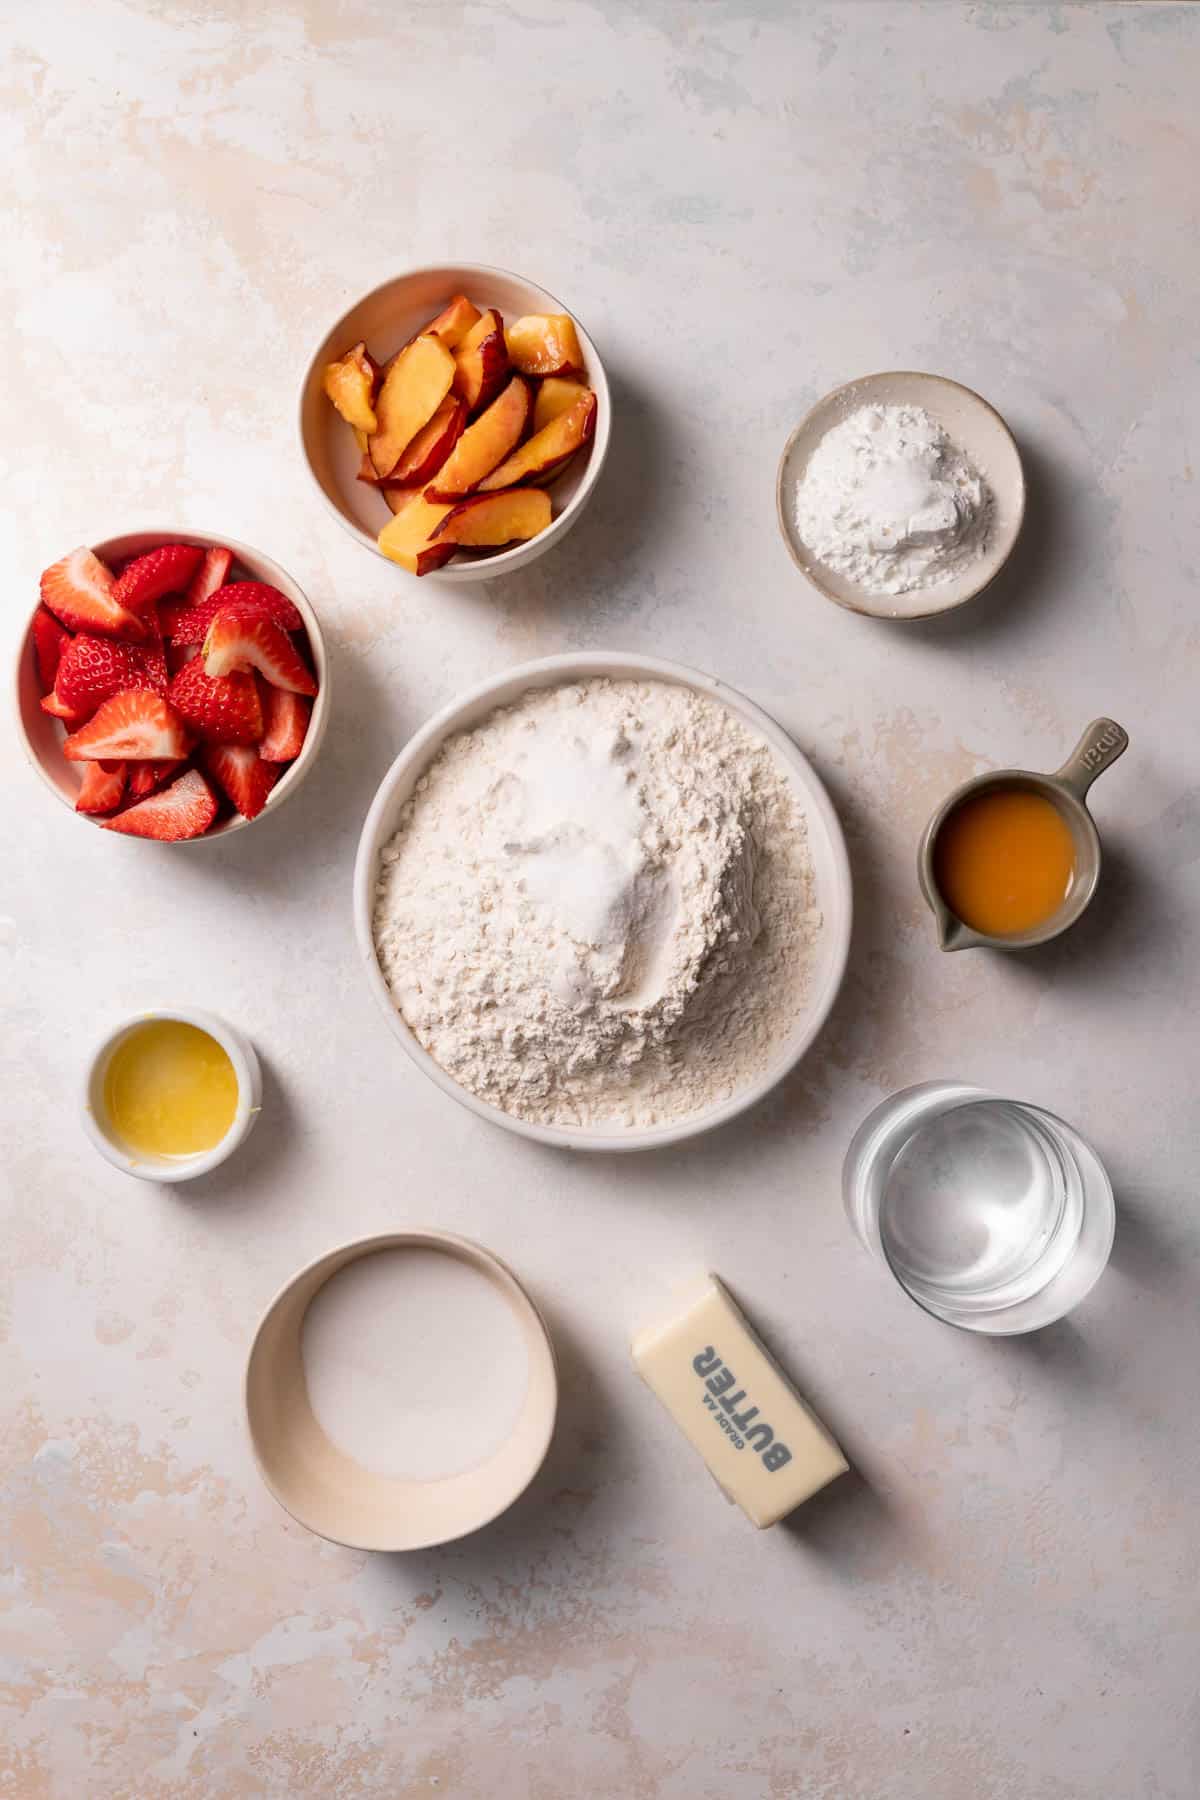
Peaches: For the best peach flavor, look for fresh, ripe peaches. A ripe peach will have a slight give when you gently press the flesh. It shouldn’t be rock-hard, but it shouldn’t be mushy either! If you have tons on hand, save extras to make my peach cinnamon rolls or peach cookies!
Vinegar: The acid from the vinegar serves as a tenderizer and gluten inhibitor, keeping your pie crust soft and tender. It also keeps the dough from turning grey in the fridge, so you can make it well in advance!
Strawberries: Look for strawberries with a uniform, bright red color all over with a green leafy cap. Use any leftovers to make my strawberry cookies!
Cornstarch: Cornstarch is used as a thickener in the pie filling to absorb some of the moisture from the fresh fruit. You can substitute it for all-purpose flour, but I recommend adding an additional 1-2 tablespoons.
Find the full ingredient measurements and instructions in the recipe card below!
Recipe Instructions
Step 1: Brown the butter. Cook the butter until there are medium-brown butter solids at the bottom of the pan, and it smells nutty. Scrape it into a parchment-lined shallow bowl and freeze until firm, then cut into cubes. For more guidance, I wrote a whole post on how to brown butter! (Image 1 below)
Step 2: Mix the dry ingredients. In a stand mixing bowl, combine the dry ingredients. Then add the browned butter. Mix until the butter is pea-sized. (Image 2 below)
Step 3: Mix in the water. Stream the cold water by the tablespoon until the dough clumps around the paddle. It should feel moist and soft, not sticky! (Image 3 below).
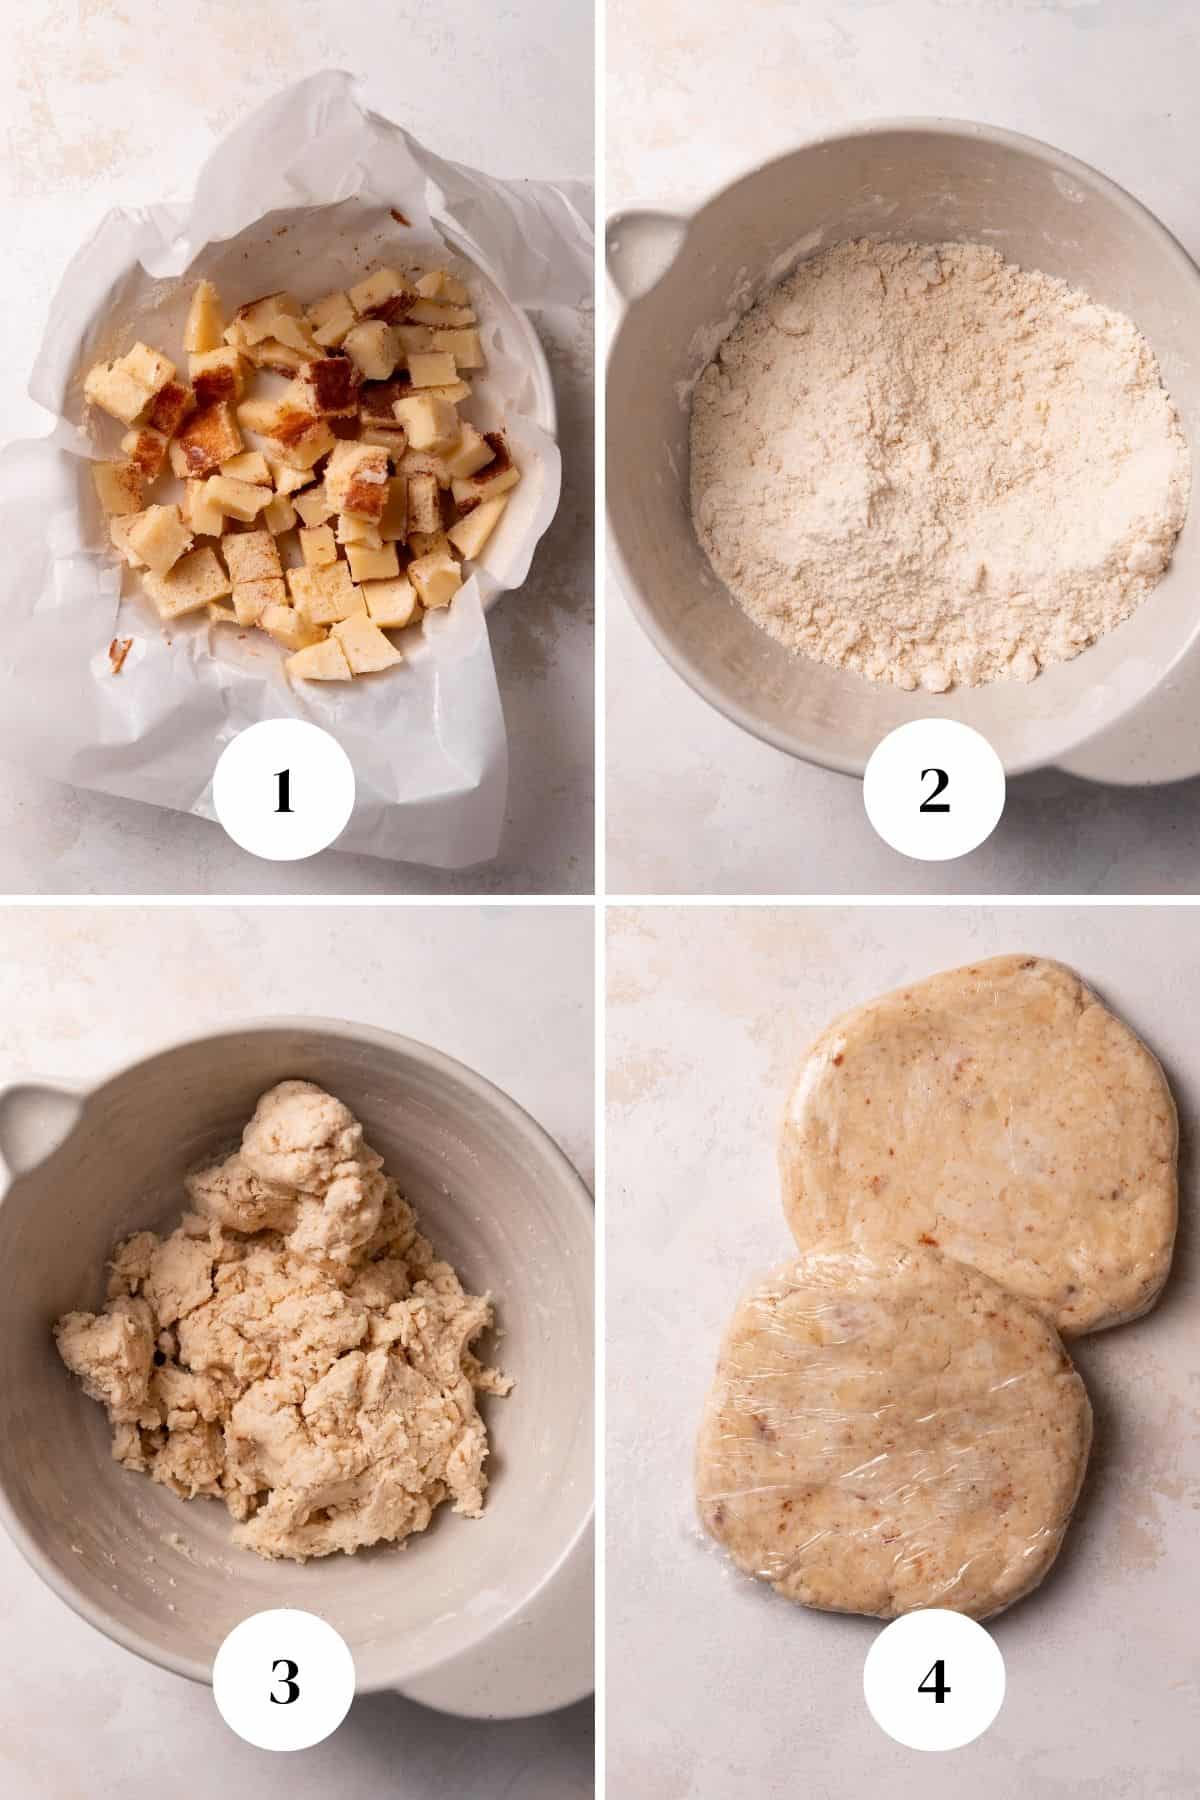
Step 4: Portion and chill the pie dough. Divide the dough into two equal balls. Wrap each loosely in plastic wrap, then use a rolling pin to roll them into a flat disc. Chill for at least 1 hour. (Image 4 above)
Step 5: Roll the pie dough. On a lightly floured surface, roll the first disc into a 12-inch circle. Transfer it to a 9-inch metal pie dish, pressing to secure the dough to the sides and bottom of the pan. (Image 5 below).
Step 6: Cut the lattice top. Roll out the second disc, cut it into ten 1-inch strips, and transfer them to a parchment-lined baking tray. (Image 6 below)
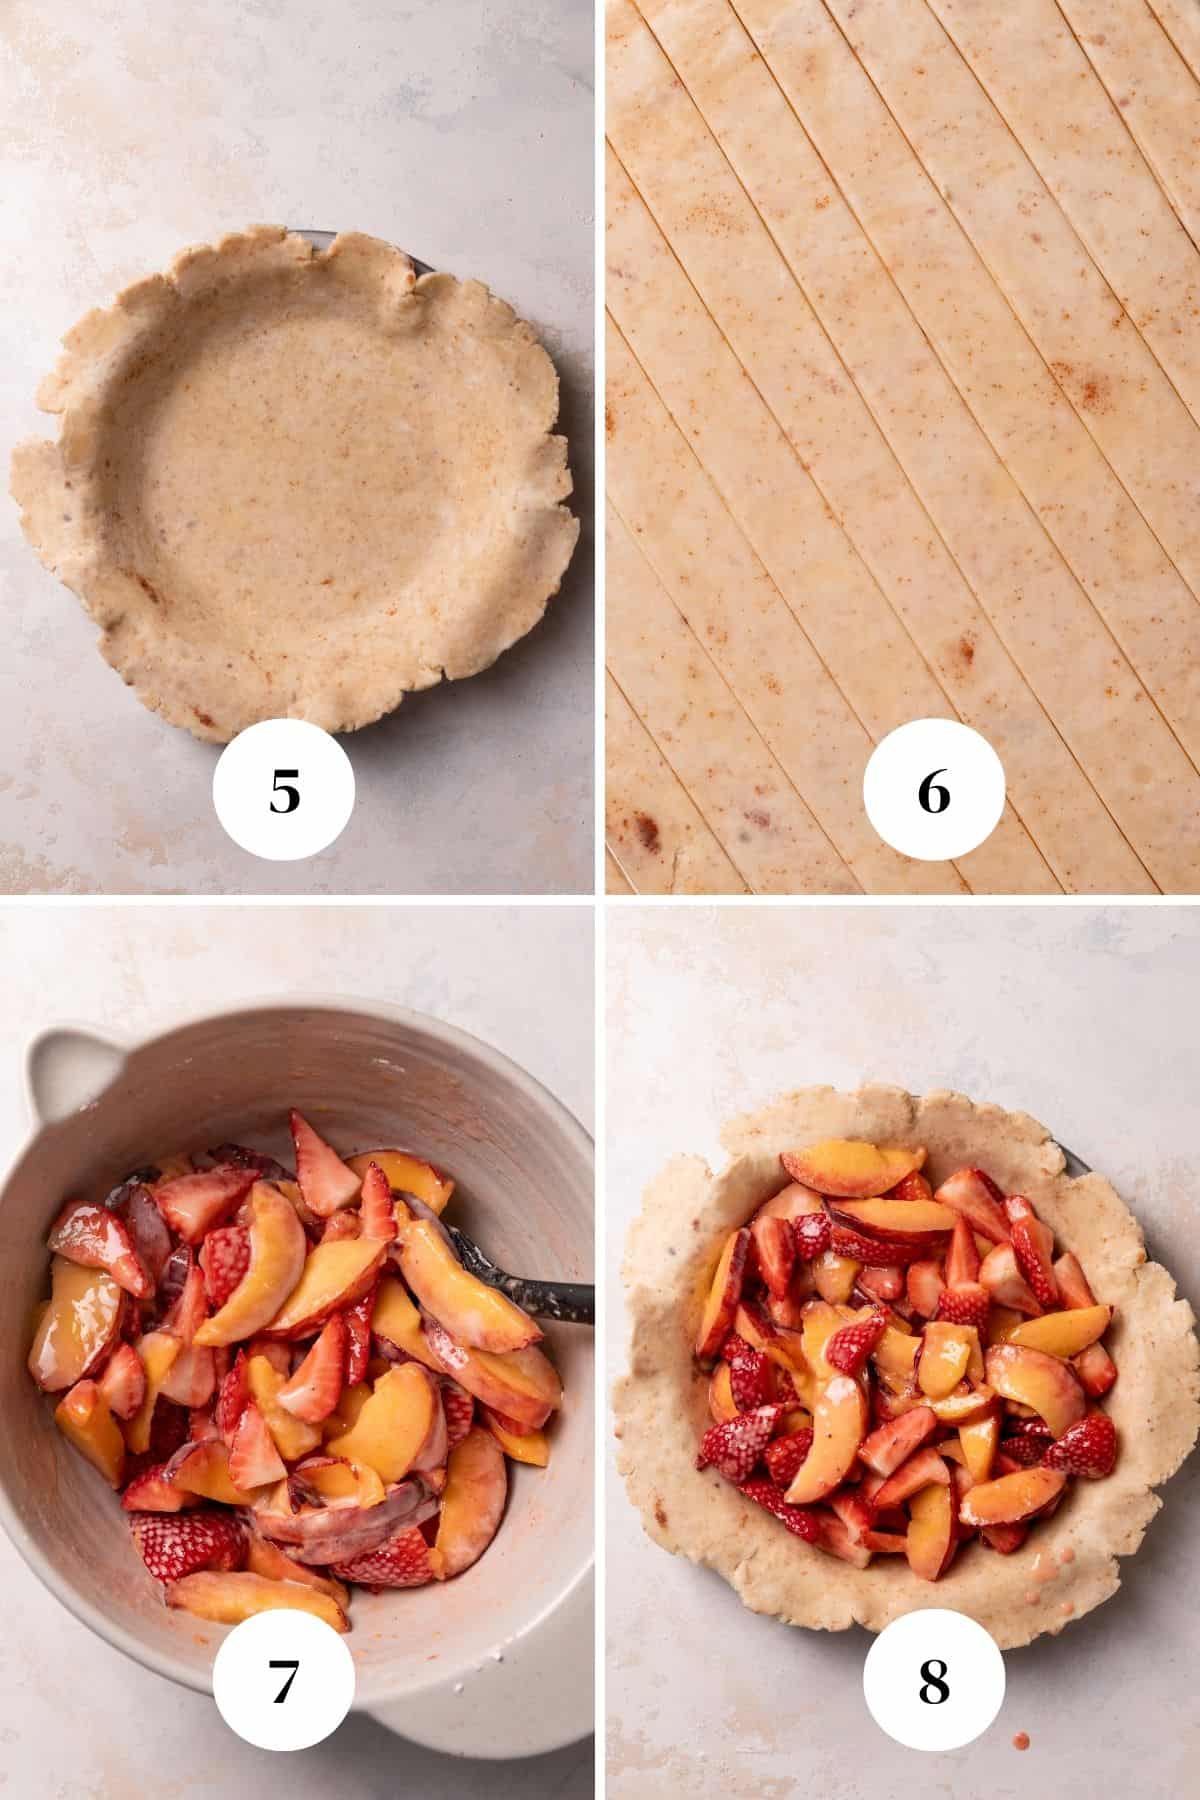
Step 7: Make the pie filling. In a large bowl, combine the sliced peaches, strawberries, sugar, lemon juice, lemon zest, cornstarch, and salt until the fruit is evenly coated. (Image 7 above)
Step 8: Fill the pie. Pour the fruit filling into the pan, leaving any juices behind, so that it evenly fills the pan. The extra juice is not needed and should be discarded! (Image 8 above).
Step 9: Assemble the lattice top. Arrange the lattice strips on the top of the fruit, laying them both horizontally and vertically, until the pattern is complete. (Image 9 below)
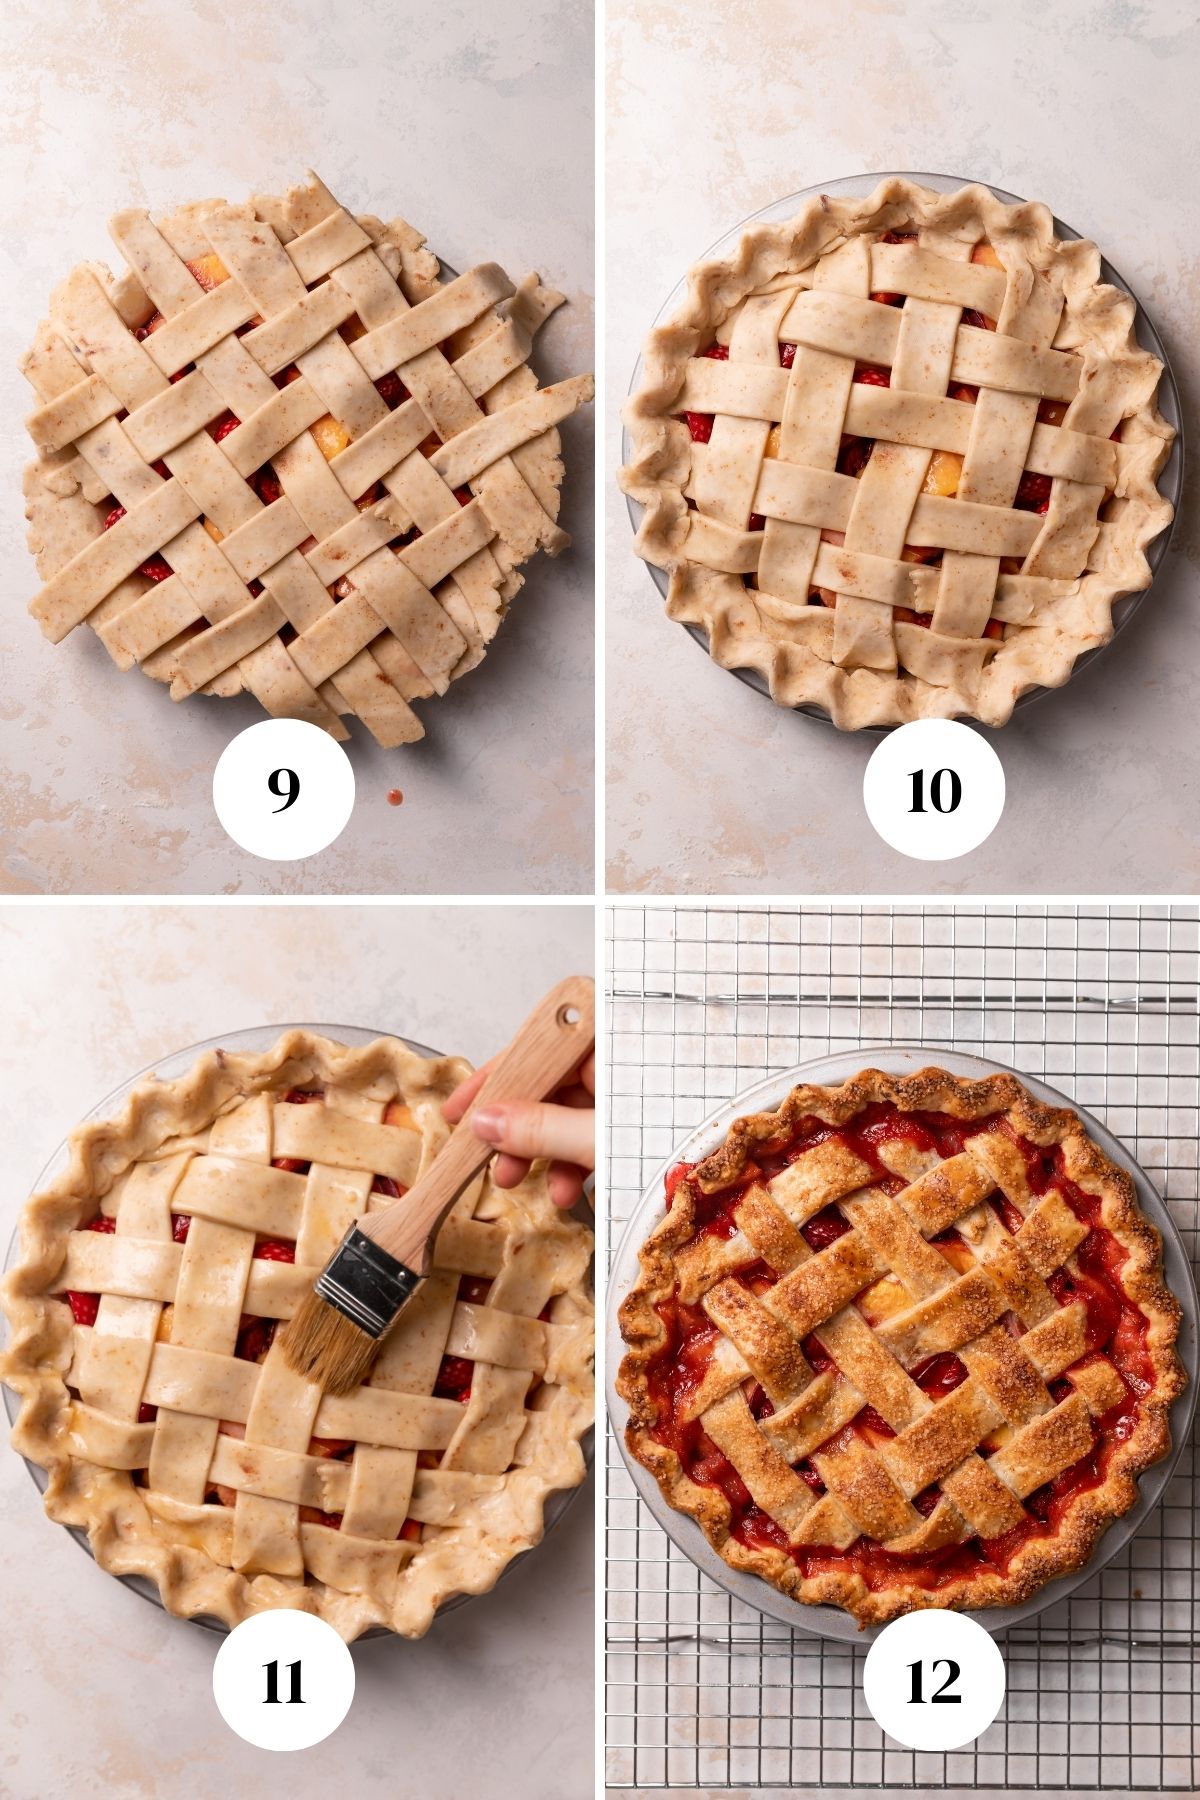
Step 10: Crimp the edges. Trim the excess dough to the edge of the pie plate, tucking the bottom crust over the lattice pieces. Crimp the edges with your knuckles. (Image 10 above)
Step 11: Bake the pie! Brush the top of the pie with the egg wash and sprinkle with turbinado sugar. Bake on a rimmed baking sheet at the high temperature first, then decrease the heat and continue baking, covering the top with aluminum foil if the crust gets too brown. (Image 11 above)
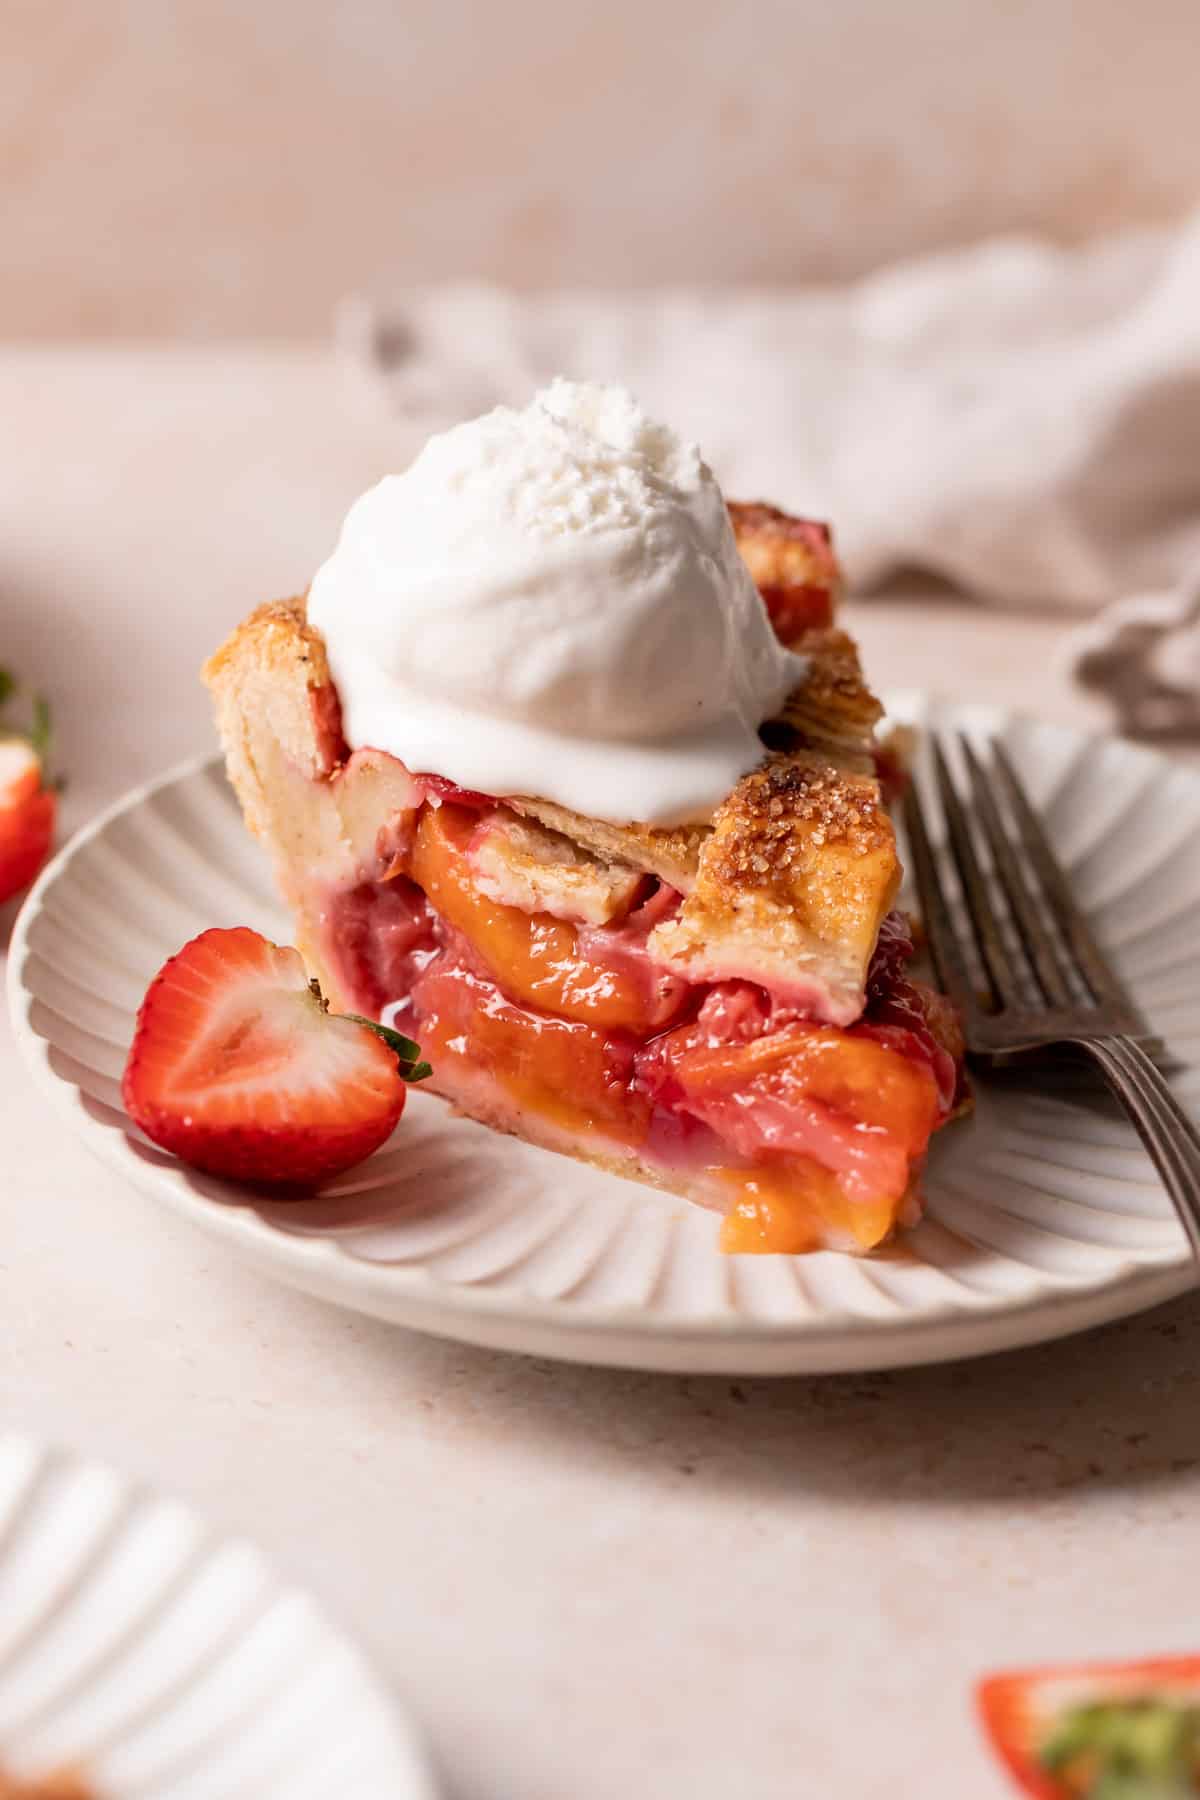
Step 12: Cool before serving. Cool the baked pie on a wire rack for at least 4 hours. This allows the filling to firm and makes it easier to cut clean slices. Serve with ice cream! (Image 12 above)
Storage and Freezing
Storage: Cover leftovers tightly in the refrigerator for up to 5 days. If you can put the pie in an airtight container, that’s even better! The pie dough can be prepped and stored in the fridge for up to 5 days or frozen for up to 3 months.
Freezer: Store the baked pie in an airtight container for up to 3 months. Let it defrost in the fridge overnight before serving!
Make it ahead. This pie does wonderfully when baked the day before. This gives it extra time for the juices to firm up before cutting.
FAQs
I highly recommend a metal pan- glass or ceramic pans retain heat differently, making the bake time and temperature different than the recipe instructions.
Yes, use a pastry cutter or two butter knives to cut the butter into the flour. You can also make it in your food processor if you have one!
I found that peeling the peaches is a personal preference. The peel softens quite a bit while baking so you don’t really notice them.
When adding the fruit filling to the pan, try not to scrape all of the excess juices into the pan. If you have very ripe fruit, you can also add an extra tablespoon of cornstarch.
I don’t recommend using frozen peaches and strawberries, as I found they turn mushy while baking.
If you tried this or any other recipe on my website, please let me know how it went in the comments; I love hearing from you! Also, please leave a star rating while you’re there! You can also tag me on Instagram or Facebook so I can check it out!
Brown Butter Strawberry Peach Pie
Equipment
Ingredients
Brown Butter Pie Crust
- 1 cup cold unsalted butter
- 2 ⅔ cups + 1 tbsp all-purpose flour, *see notes below for measuring*
- 3/4 teaspoon fine sea salt
- 1/2 cup water
- 1 tbsp apple cider or white vinegar
- 1 whole egg, whisked
Strawberry and Peach Filling
- 3 cups fresh sliced peaches
- 3 cups fresh strawberries, hulled and quartered
- ¼ cup granulated sugar
- ¼ cup + 1 tbsp cornstarch
- 1 tbsp lemon juice
- 1 tsp lemon zest
- ¼ tsp fine sea salt
- 2-3 tbsp Turbinado sugar, optional
Instructions
Make the Pie Dough
- Line a shallow bowl with parchment paper. Set aside.
- In a stainless steel pan, cook the butter over medium heat for 10-12 minutes, or until there are medium brown butter solids and the butter smells nutty. You should have about 185 g or just under 1 cup of browned butter. Scrape the butter into the bowl and chill in the freezer until firm, about 1 hour.1 cup (226 g) cold unsalted butter
- Once completely frozen, remove the parchment paper and cut the butter into cubes. Place it back in the freezer until ready to use.
- In a stand mixing bowl, combine the flour and salt. Then add the cubed browned butter. Mix the butter on low speed until small, pea-sized pieces remain, and it resembles coarse sand, about 3 minutes.2 ⅔ cups + 1 tbsp (344 g) all-purpose flour, 3/4 teaspoon fine sea salt
- Measure out the water and vinegar into a cup, then add ice. Stir to melt some of the ice and chill the water.1/2 cup water, 1 tbsp apple cider or white vinegar
- With the mixer running on low, drizzle the ice water into the bowl by the tablespoon. You will need about 10-15 tablespoons of water. When the dough starts to clump around the paddle, stop mixing. It should feel moist and soft, but not sticky.
- Divide the dough into two rounds. Wrap each one in plastic wrap and roll them into flat round discs. Each disc should hold about 335 grams of dough. Chill in the fridge for at least 1 hour.
Assemble the Pie
- Preheat the oven to 425 F/218 C.
- Take one disc of dough from the fridge and place it on a lightly floured surface. Lightly dust the top of the dough and your rolling pin with flour.
- Start from the center and work your way out in all directions, turning the dough with your hands as you go. Between passes of the rolling pin, rotate the pie crust and even flip it, to make sure it’s not sticking to your work surface. Sprinkle on a little more flour if it’s sticking.
- Roll it into a circle about ⅛ inch thick and 12” in diameter. Roll it up onto your rolling pin and transfer it to a 9” metal pie pan. Always be gentle with your pastry dough. You don’t want it to tear. Chill in the fridge while you roll out the second disc.
- Roll the second disc in the same way, to an ⅛ inch thick round. Cut out 1 inch strips and transfer them to a parchment-lined baking tray. Chill the lattice in the fridge while you make the filling.
- In a large bowl, combine the strawberries, peaches, sugar, lemon juice, lemon zest, cornstarch, and salt. Pour the filling into the pie dish, leaving all of the excess liquid in the bowl. The extra liquid is not needed and should be discarded.3 cups (430 g) fresh sliced peaches, 3 cups (390 g) fresh strawberries, ¼ cup (50 g) granulated sugar, 1 tbsp lemon juice, 1 tsp lemon zest, ¼ tsp fine sea salt, ¼ cup + 1 tbsp (40 g) cornstarch
- To make the lattice, arrange the vertical strips on the top of the filling. Pull back every other strip to the middle of the pie. Lay one strip down horizontally, then bring the vertical strips back down. Repeat this until the entire lattice is complete.
- Trim the excess dough to the very edge of the pie dish, tucking the bottom crust over the lattice pieces. Crimp the edges with your knuckles.
- Brush the top crust of the pie with the egg wash. Sprinkle with turbinado sugar.1 (50 g) whole egg, 2-3 tbsp Turbinado sugar
- Place the pie on a rimmed baking sheet. Bake for 25 minutes. Without opening the oven, decrease the heat to 350 F/180 C and continue baking for another 40-50 minutes. Cover the top with foil if the crust starts to get too brown.
- Let the pie cool on a wire rack for at least 4 hours at room temperature before serving. This allows the filling to thicken up and make it easier to cut. Serve with ice cream and enjoy!


I am making this pie crust with apple pie filling. Can I make the piecrust a day ahead and leave it in the fridge for that long?
Yes, absolutely. Just wrap it tightly so it doesn’t dry out. When you’re ready to use it, let it sit on the counter for a few minutes so it softens slightly and rolls out smoothly.
Awesome, thank you so much, how many days in advance would be to many?
I normally recommend 1-2 days in advance. 3 days is pushing it, but if it’s wrapped really well that can work!
Hi, I’m making this pie out of season and none of my grocery stores have fresh peaches so am i able to use frozen peaches?
Yes! I would defrost them and make sure to remove as much excess liquid as possible.