

These flaky and tender savory scones are stuffed with cheddar cheese, crispy bacon, and fresh scallions. Perfect for breakfast or brunch, they’re ready to eat in less than 1 hour!

Early mornings as a pastry chef meant baking hundreds of warm buttery breakfast scones. Since then, I’ve perfected my recipe! Similar to sweet versions like my apple scones or wild blueberry scones, these savory scones have a fluffy and tender texture but are packed with morning favorites like crumbled bacon, cheddar cheese, and green onions.
They’re my favorite when I don’t have time to make my breakfast quiche—just one bowl, simple ingredients, and you can easily mix up the flavors. Try pumpkin scones for fall!
Table of Contents
Tips for Bakery-Style Scones
Use a kitchen scale. Baking with a scale is my #1 baking tip! Packing flour into your measuring cup will result in dry and crumbly scones.
Let the dough rest. This trick of letting the dough rest allows the cream to fully hydrate the flour, resulting in a melt-in-your-mouth texture!
Freeze the butter. Cold butter creates pockets of steam as it bakes, leading to a light and flaky scone. Throw the butter in the freezer 30 minutes before you start baking, and then keep it there once grated so it doesn’t get warm!
Gently shape the dough. Don’t roll the dough out, or the scones will be dense. Pat the dough gently into a circle instead!
Ingredient Notes and Substitutions
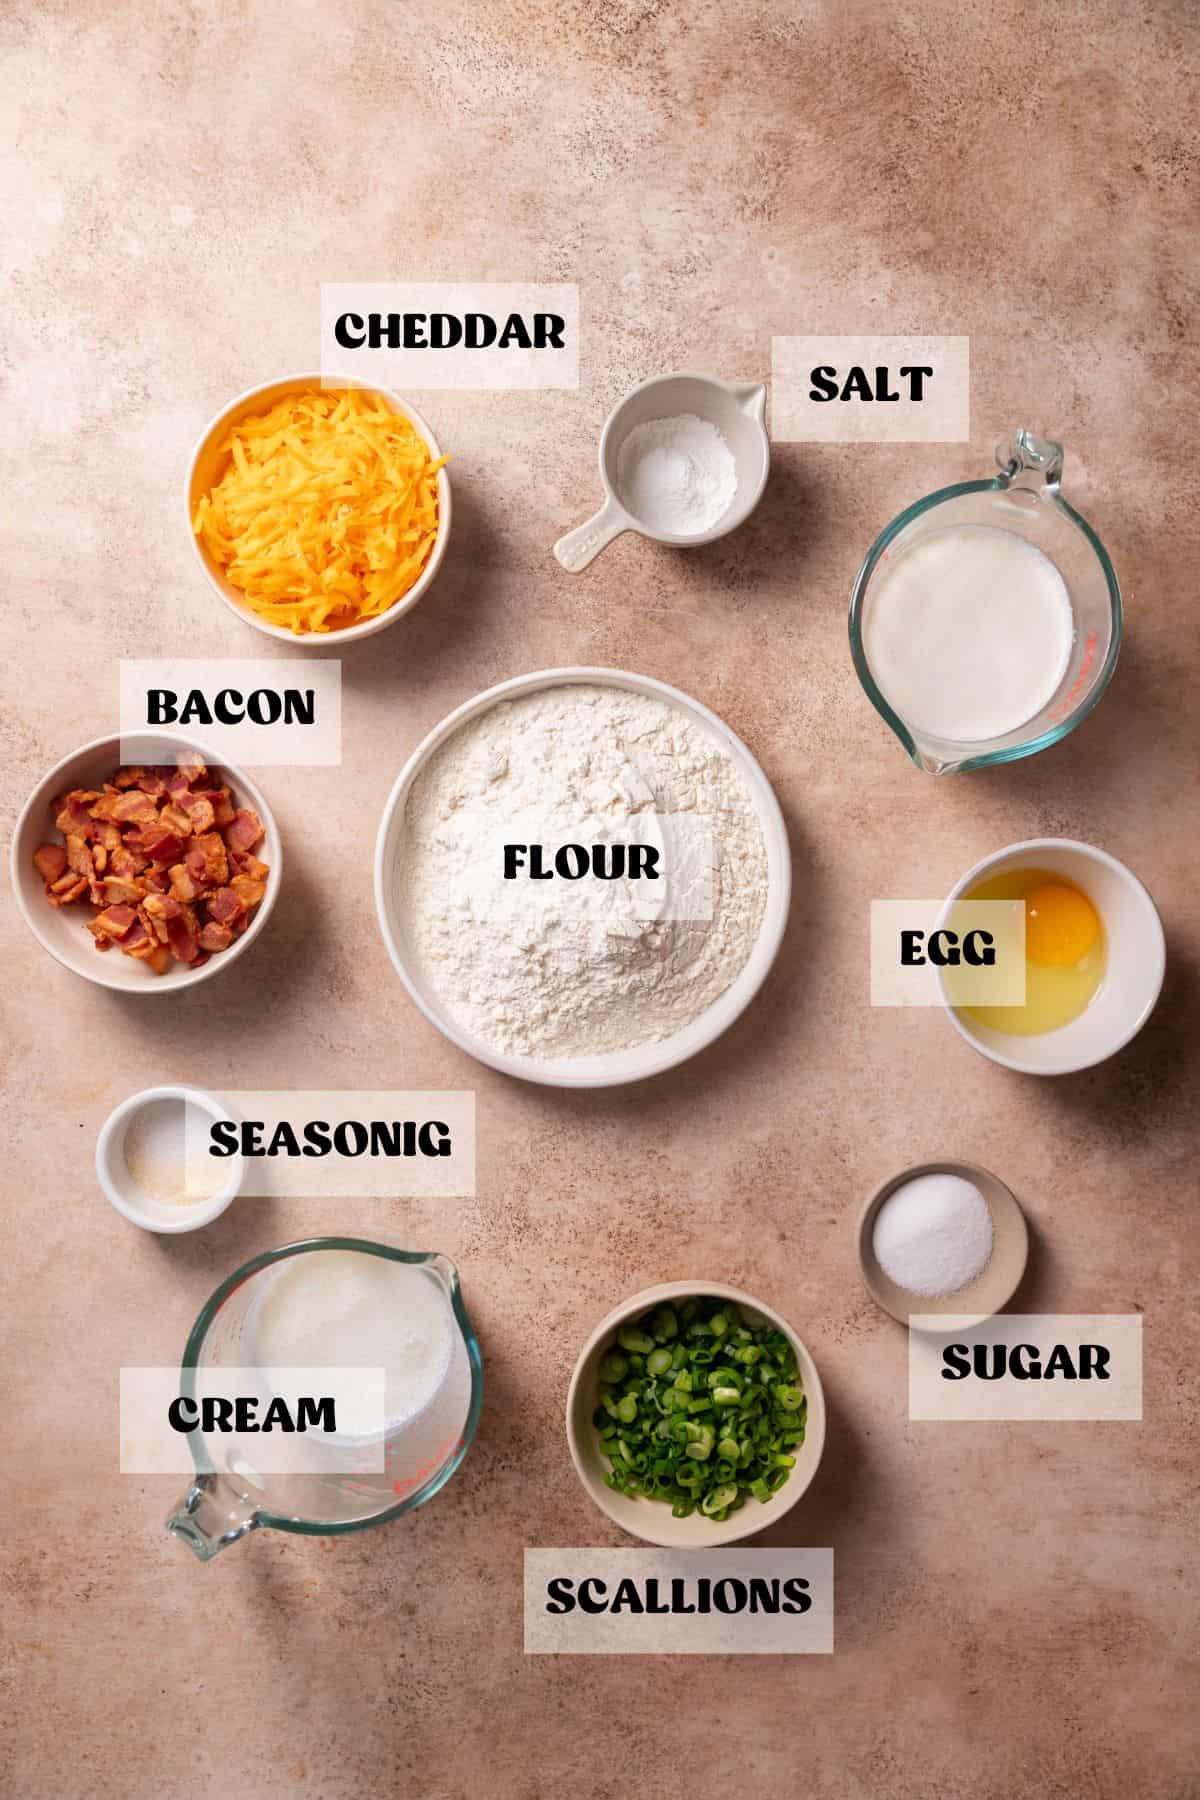
Scallions: For the best flavor, use both the white and green parts. The white parts offer a milder onion flavor, while the green parts add a fresh, herby bite.
Cheddar cheese: Sharp cheddar adds a bold flavor, while mild cheddar creates a creamier flavor. You can also try smoked cheddar or white cheddar cheese. I recommend shredding your own; freshly shredded cheese melts better than pre-shredded!
Bacon: Thick-cut bacon adds more textural contrast, while thin-cut bacon distributes more evenly throughout the scone. I cut roughly 6 thick-cut slices of bacon into batons and fried them in a pan.
Heavy cream: Adds richness and moisture to the dough—just like my raspberry scones! Make sure your cream is very cold because it’s essential for flaky layers. There is no substitute.
Butter: Use a full-fat butter like Kerrygold for the best bakery-style flavor! Unsalted is preferred since the bacon and cheese are both salty; it will give you more control over the final flavor of the scones.
Full ingredient measurements and instructions can be found in the recipe card below!
Recipe Instructions
1
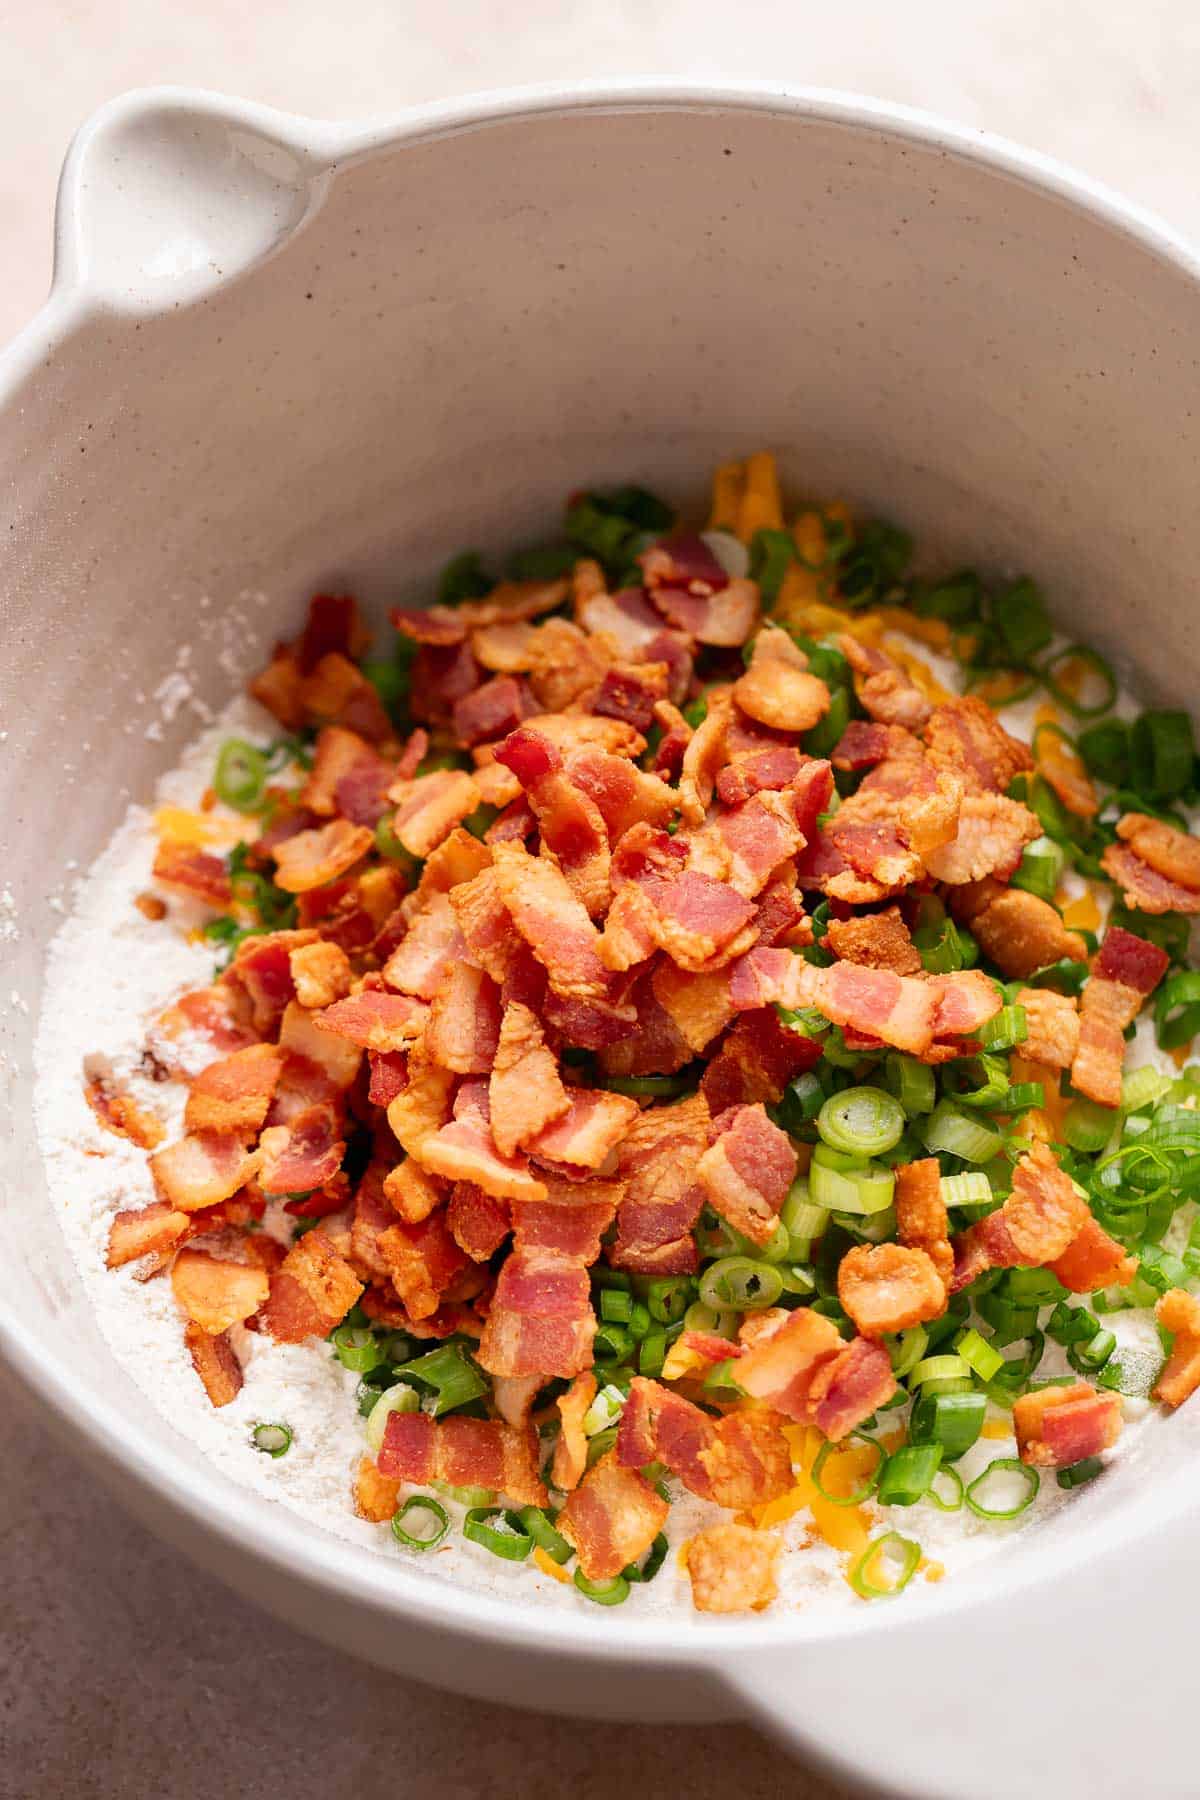
Combine the dry ingredients. Mix together the flour, grated butter, baking powder, spices, green onions, cheddar cheese, and crispy bacon in a large bowl.
2
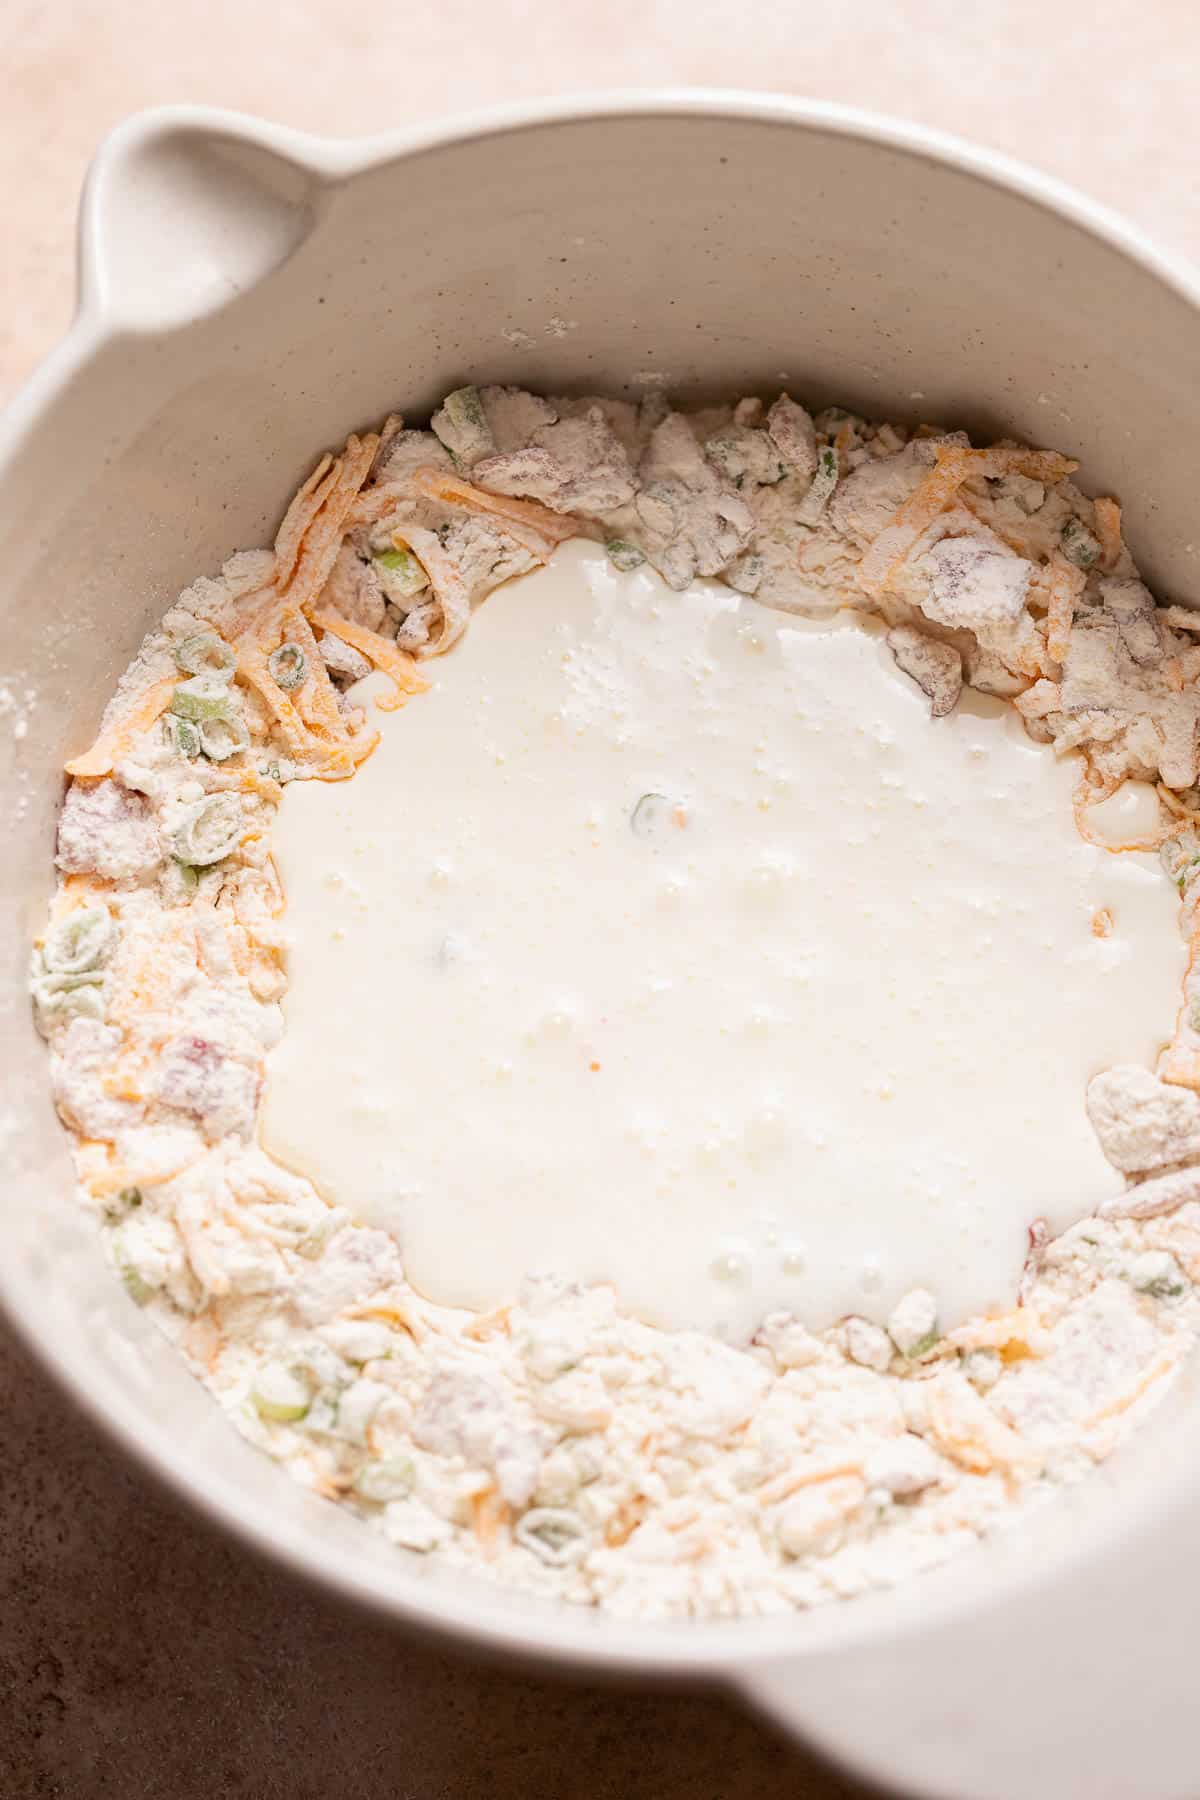
Make a well for the cream. Make a well in the center of the bowl and pour in the cream. Use a rubber spatula to start to mix the dough together gently.

3
Pull the dough apart. Then, use your hands to scoop up the dough and let it fall through your fingers, breaking up any large clumps.
Chill the bowl in the fridge for 15 minutes. This hydrates the dough and makes it easier to work with!

4
Form into a circle. Dump the scone dough onto a lightly floured surface and form the clumps into an 8″ round.
Do not work or knead the dough too much, or the scones will be dense and tough.

5
Cut out the scones. Cut the dough into 8 segments- dipping a bench scraper or knife into flour after every cut to keep it from sticking.
Transfer each one to a parchment-lined baking sheet and chill in the fridge until ready to bake.

6
Bake! Brush the tops of the scones with egg wash or more cream. Sprinkle with flaky sea salt if desired, then bake!
You’ll know they’re ready when the tops are golden brown, and the internal temperature is 175°F/80°C.
Storage, Freezing, and Reheating
Storage: Keep the baked scones at room temperature in an airtight container for up to 3 days.
Reheating: Best served warm, they can be reheated in the microwave in 20-second increments or in an oven at 300°F until warmed through.
Freezing: After cutting, let them freeze solid on a baking tray, then transfer them to an airtight container with parchment paper between layers. They can be baked straight from the freezer—just add a few minutes to the baking time!
FAQs
Using too much flour or not enough liquid can result in a very dry dough. Add one tablespoon of cream at a time until it feels hydrated if needed.
Yes, you can use any kind of cheddar or other cheese. You can also omit it if desired!
If there is too much cream added to the dough, it will be very sticky. Add one tablespoon of flour to the dough as needed.
The circle of dough will be roughly 1.5-2 inches tall.

More Breakfast Recipes
If you tried this or any other recipe on my website, please let me know how it went in the comments; I love hearing from you! Also, please leave a star rating while you’re there! You can also tag me on Instagram or Facebook so I can check it out!

Savory Bacon, Cheddar, & Scallion Scones
Ingredients
- 4 tablespoon unsalted butter, frozen
- 2 cups all-purpose flour, *See notes below for measuring*
- 1 cup shredded sharp cheddar cheese
- 3/4 cup crispy bacon
- 2/3 cup thinly sliced green onion
- 4 teaspoons granulated sugar
- 2 3/4 teaspoons baking powder
- 1/2 teaspoon fine sea salt
- 1/2 teaspoon garlic powder
- 1/2 teaspoon onion powder
- 1 cup + 2 tablespoons heavy cream, cold
- 1 egg, lightly beaten
- Flaky sea salt, optional
Instructions
- Line a baking sheet with parchment paper. Set aside.
- Grate the frozen butter into a bowl and keep in the freezer until ready to use.4 tablespoon (56 g) unsalted butter
- In a large bowl, combine the flour, frozen butter, cheese, bacon, green onions, sugar, baking powder, salt, garlic powder, and onion powder.2 cups (260 g) all-purpose flour, 1 cup (80 g) shredded sharp cheddar cheese, 3/4 cup (60 g) crispy bacon, 2/3 cup (40 g) thinly sliced green onion, 4 teaspoons (20 g) granulated sugar, 2 3/4 teaspoons baking powder, 1/2 teaspoon fine sea salt, 1/2 teaspoon garlic powder, 1/2 teaspoon onion powder
- Make a well in the center of the bowl and pour in the cold cream. Gently stir with a rubber spatula until mostly combined, then use your hands to scoop up the dough and let it fall through your fingers, breaking up any large clumps and hydrating all of the dough at the bottom of the bowl. Then, chill the bowl in the fridge for 15 minutes.1 cup + 2 tablespoons (266 g) heavy cream
- Once rested, dump the dough onto a lightly floured surface and gently press the clumps together into an 8” round. Cut into 8 scones, then place each one onto a parchment-lined baking tray. Chill the tray in the fridge while the oven preheats to 400 F/205 C.
- When the oven is ready, brush the tops of the scones with some of the lightly beaten egg (or heavy cream), sprinkle with flaky sea salt (optional), and bake for 15-20 minutes, until the tops are golden brown.1 egg, Flaky sea salt
- Cool the tray on a wire rack for 10 minutes, then enjoy!


After spending part of my morning, debating whether or not I wanted to order Uber eats for a savory scone. I decided on this recipe. I figure at least if I make it myself, I won’t be so disappointed as if I had spent a ridiculous amount of money on it. This recipe definitely did not disappoint! I have it saved, bookmarked , and pinned in my Pinterest. I definitely usedmy kitchen scale to measure the ingredients and the recipe was nearly full proof. Thank you so much for sharing!
Ahhhh! This is the best review ever. Thank you for trying the recipe Erica, I’m so happy you enjoyed them!