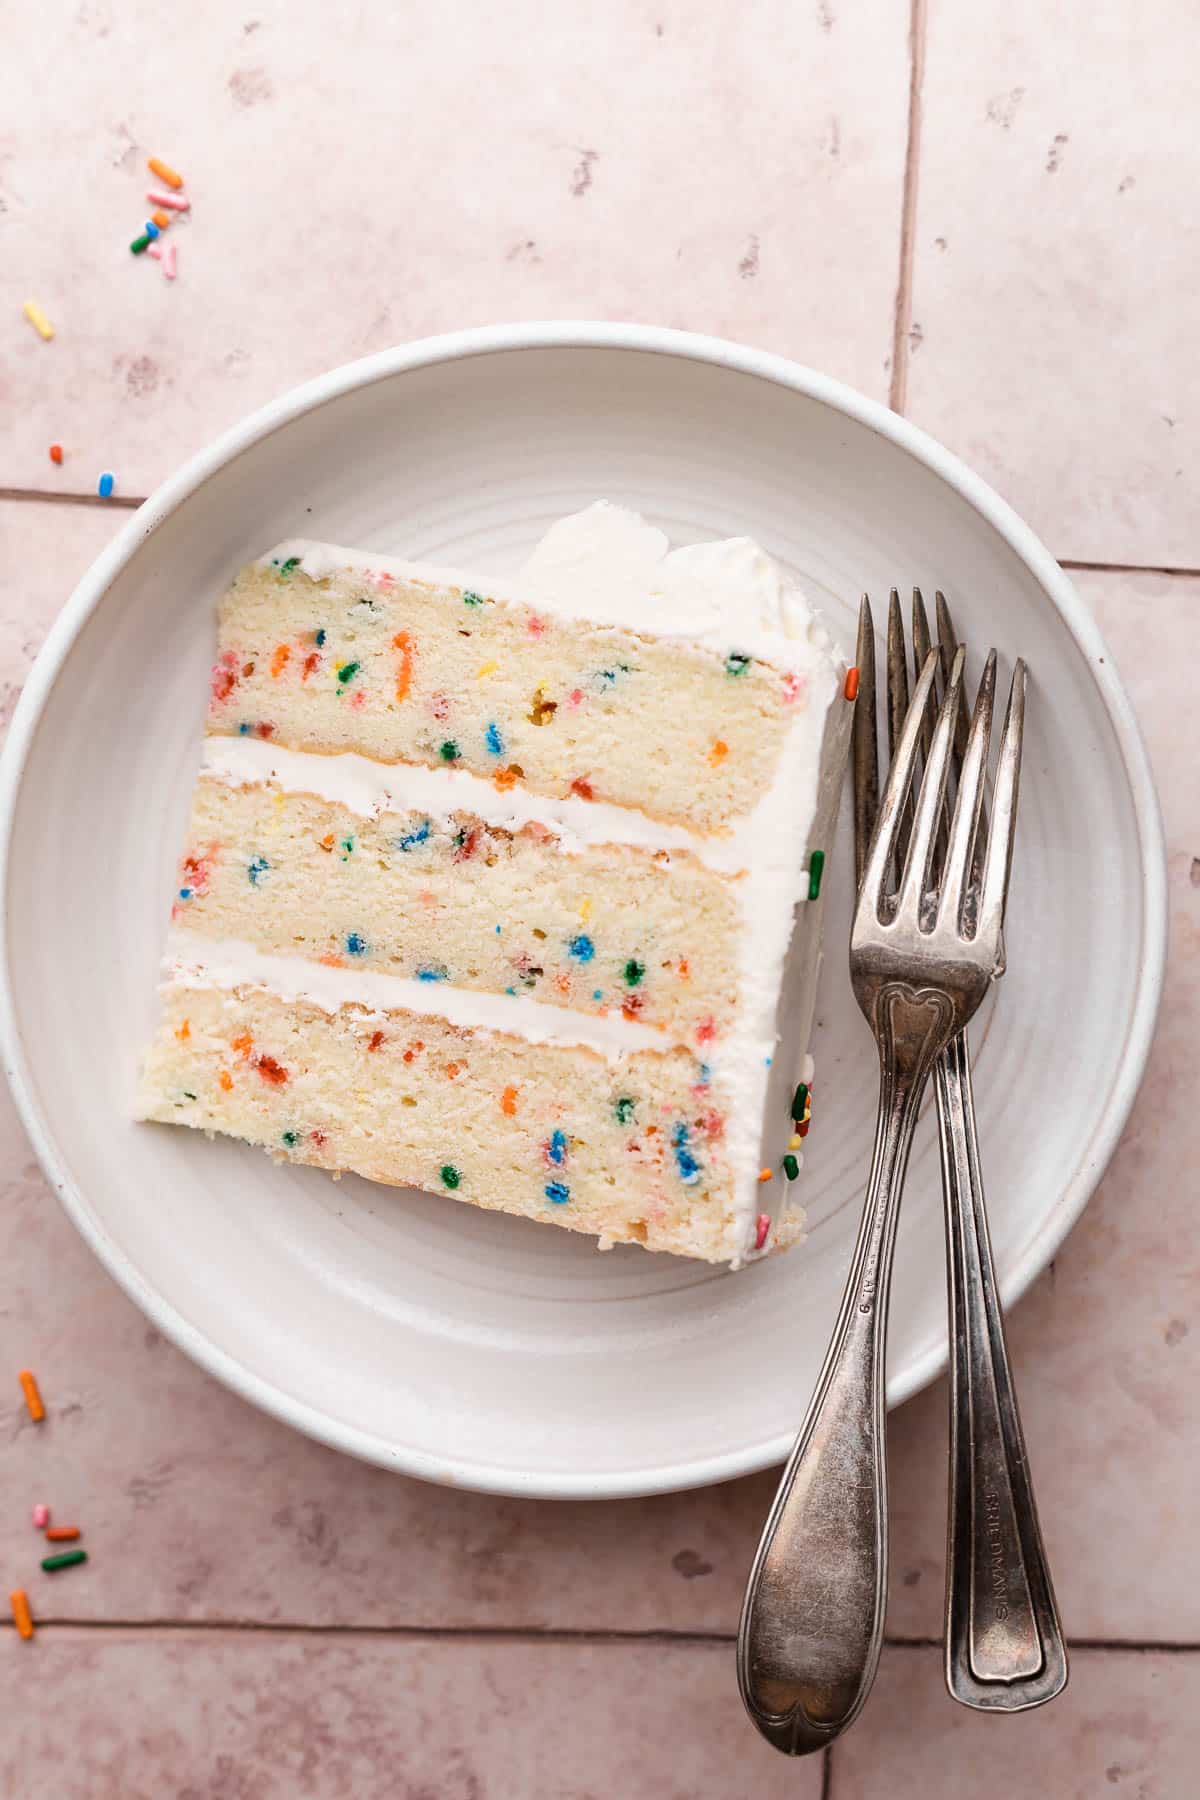
This is the BEST 8 inch cake recipe you’ll ever make! Soft, fluffy, and studded with rainbow sprinkles, this vanilla cake is perfect for any or no occasion at all!
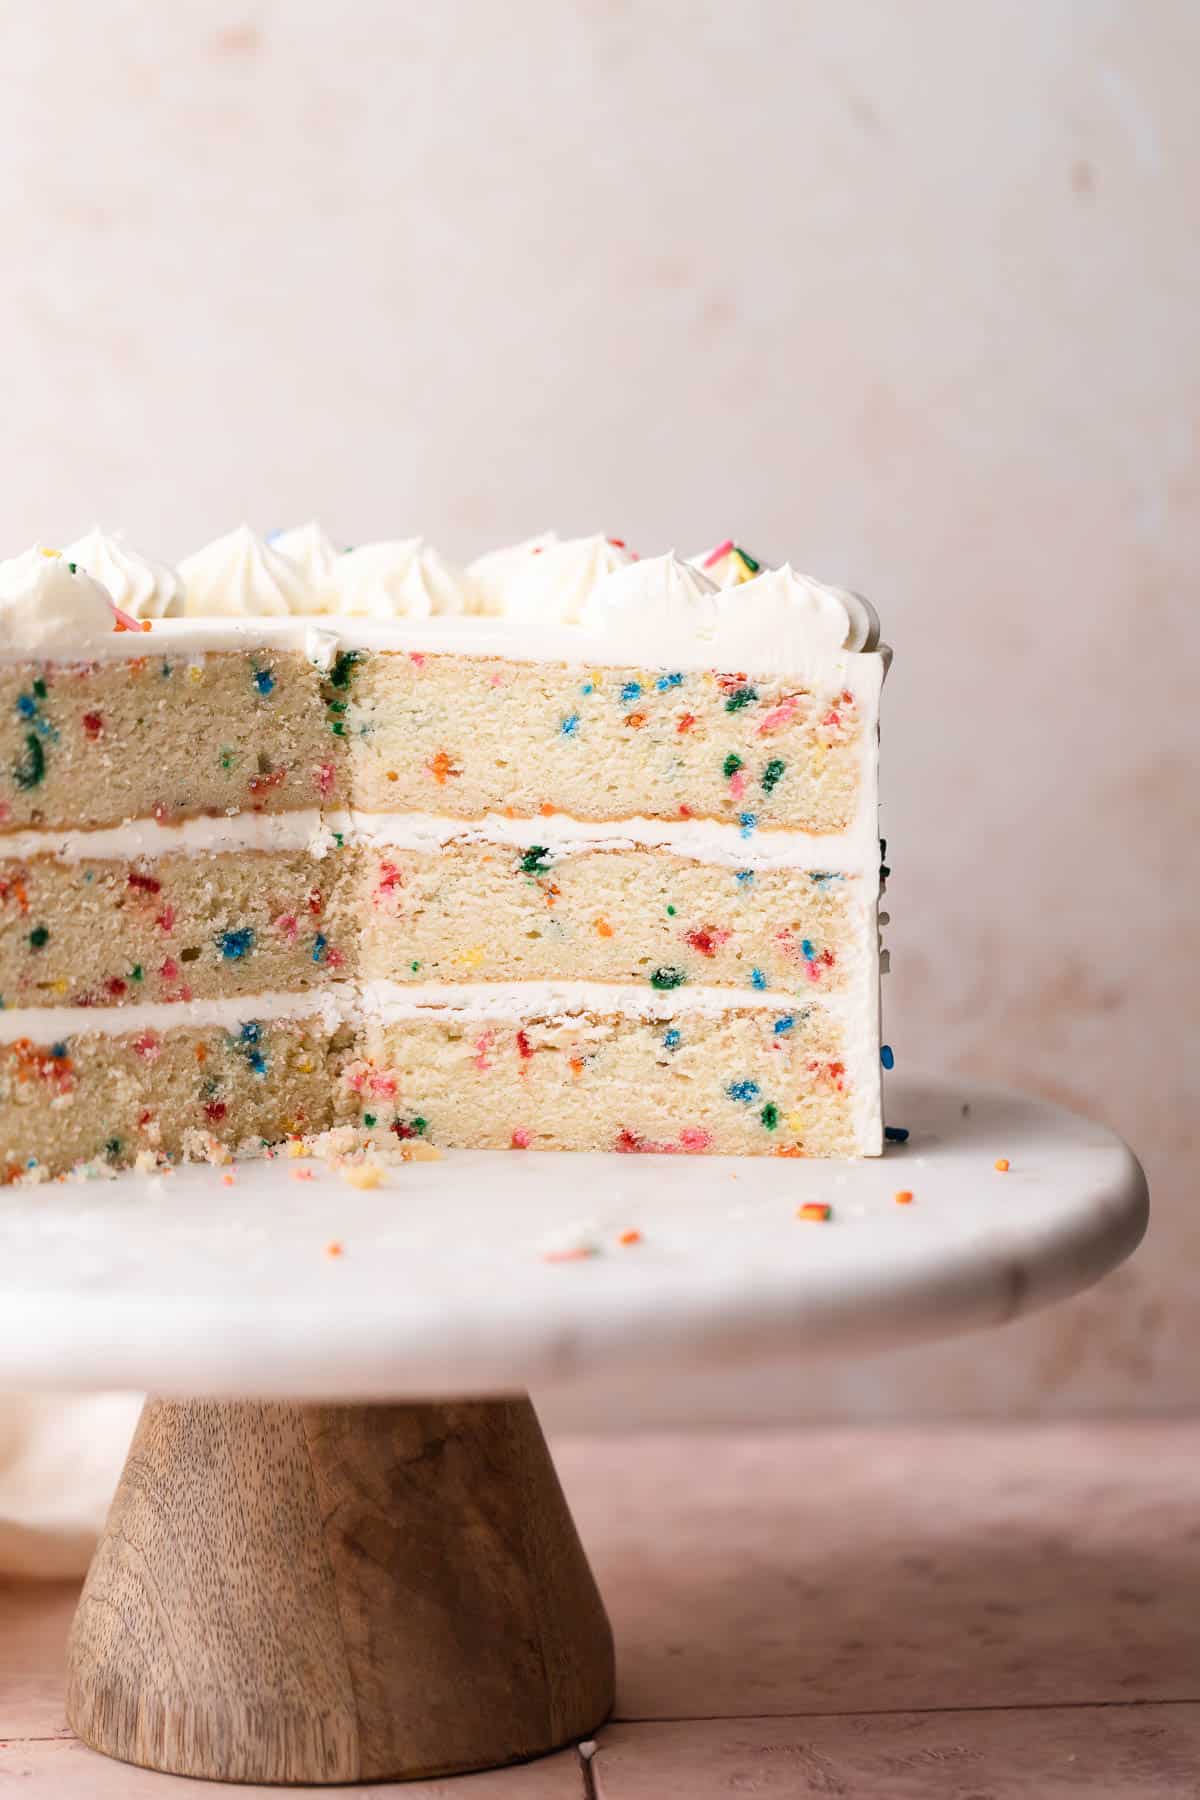
If you are in need of an incredibly soft and fluffy 8 inch cake, look no further! This is the best vanilla cake recipe as it is not too sweet and is covered in a beautiful silky smooth vanilla buttercream.
This is one of my favorite cake recipes as it uses the reverse creaming method which yields a ridiculously tender texture that stays soft and moist for days. It’s perfect for making a round layer cake and can easily be decorated for any occasion.
If this is your first time making a cake from scratch, don’t worry, I have lots of step-by-step photos and instructions that make you feel like we are baking together in my kitchen! (How freaking cool would that be though??)
If you need a smaller cake, my 6-inch earl grey cake is one of my absolute favorites!
Table of Contents
How to Make It
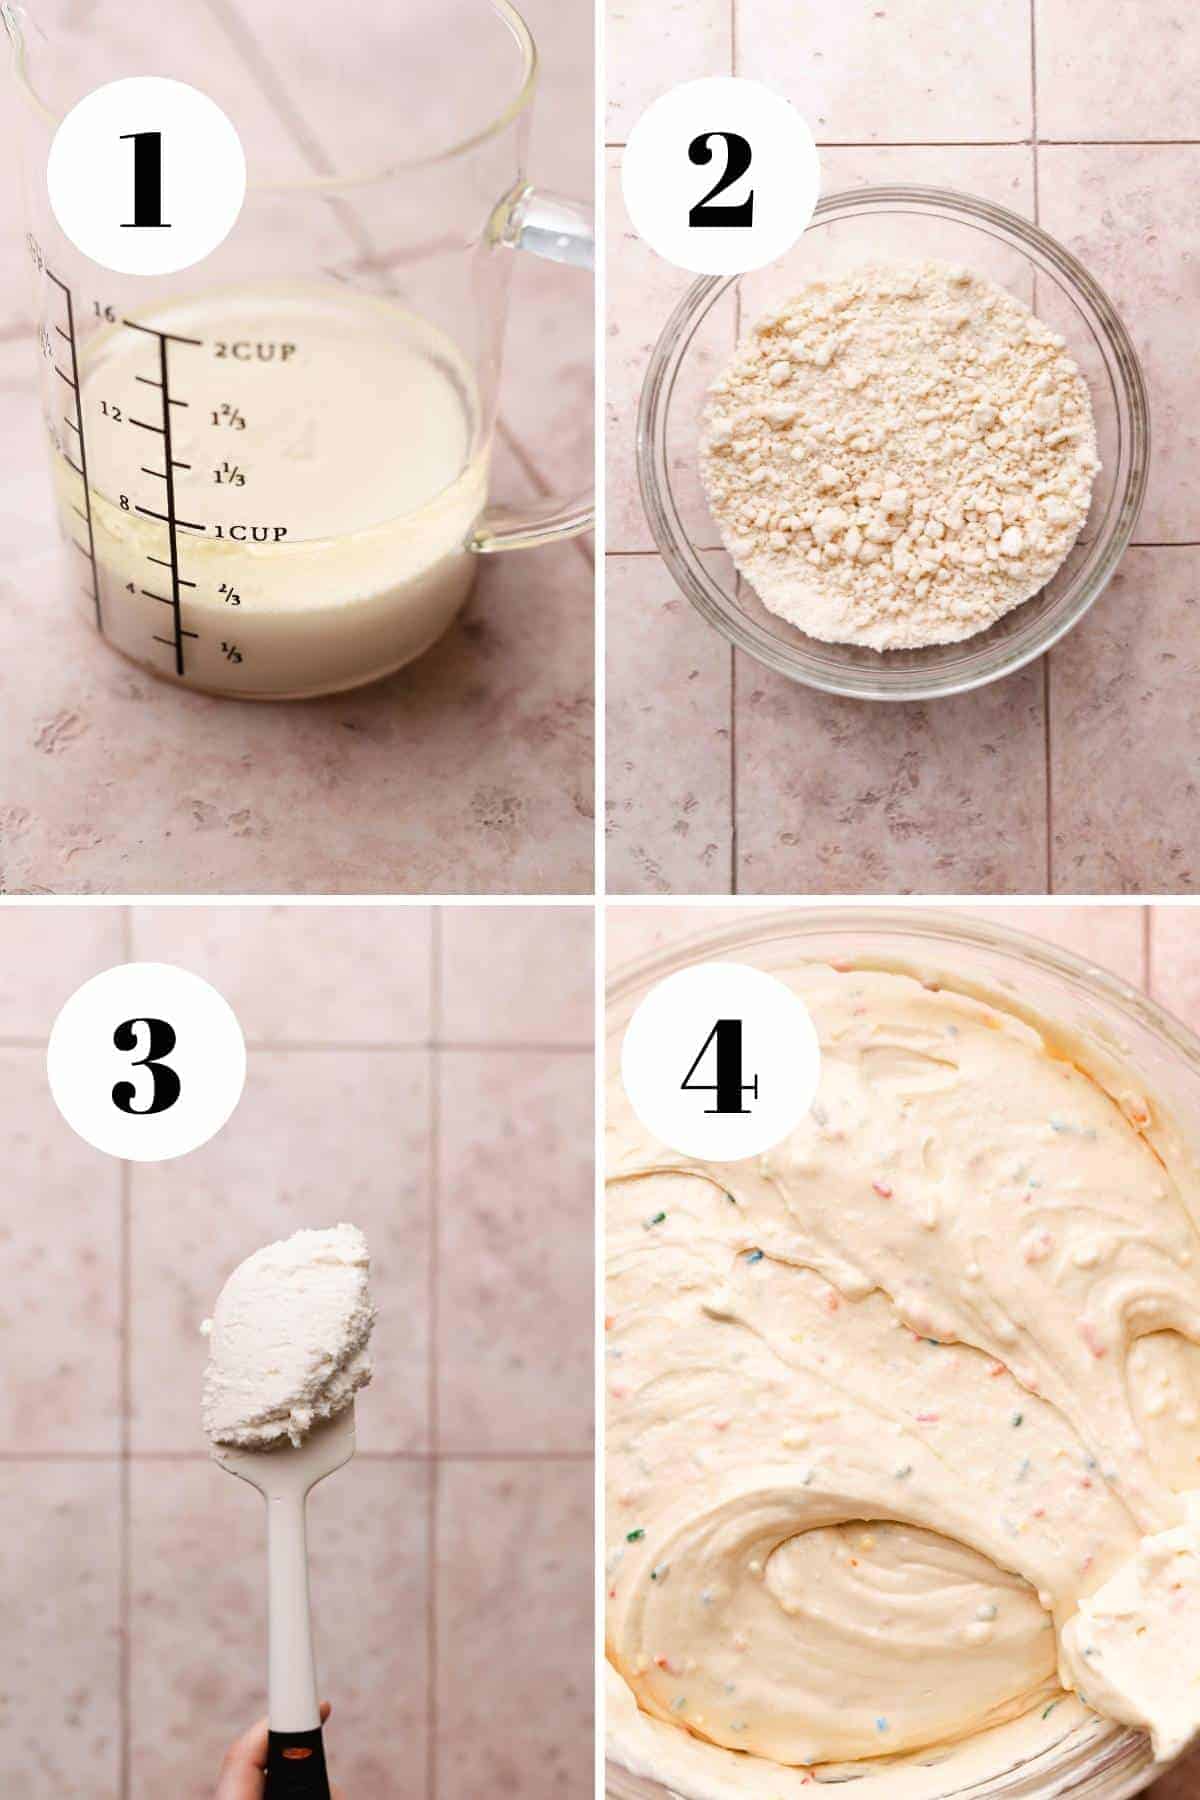
Step 1: Whisk together half of the milk and the canola oil in a bowl and set aside.
Step 2: In the bowl of a stand mixer or a large bowl with a hand mixer, mix together the cake flour, sugar, kosher salt, and baking powder with the paddle attachment on low speed until well combined.
Add the cubed butter and mix on low for about 30-40 seconds until it looks crumbly and resembles coarse sand.
Step 3: Stream the milk and oil mixture into the bowl and then mix on medium speed for 2 minutes, until it looks smooth and white in color. Set a timer to ensure the batter gets mixed long enough, this mixing time is critical for creating the structure!
Step 4: Whisk together the whole eggs, vanilla extract, and the other half of the milk, then stream it into the bowl while mixing at low speed. Scrape down the sides and bottom of the bowl then mix one last time until everything looks homogenous.
Add the rainbow confetti sprinkles to the mixing bowl and use a rubber spatula to gently fold them into the batter.
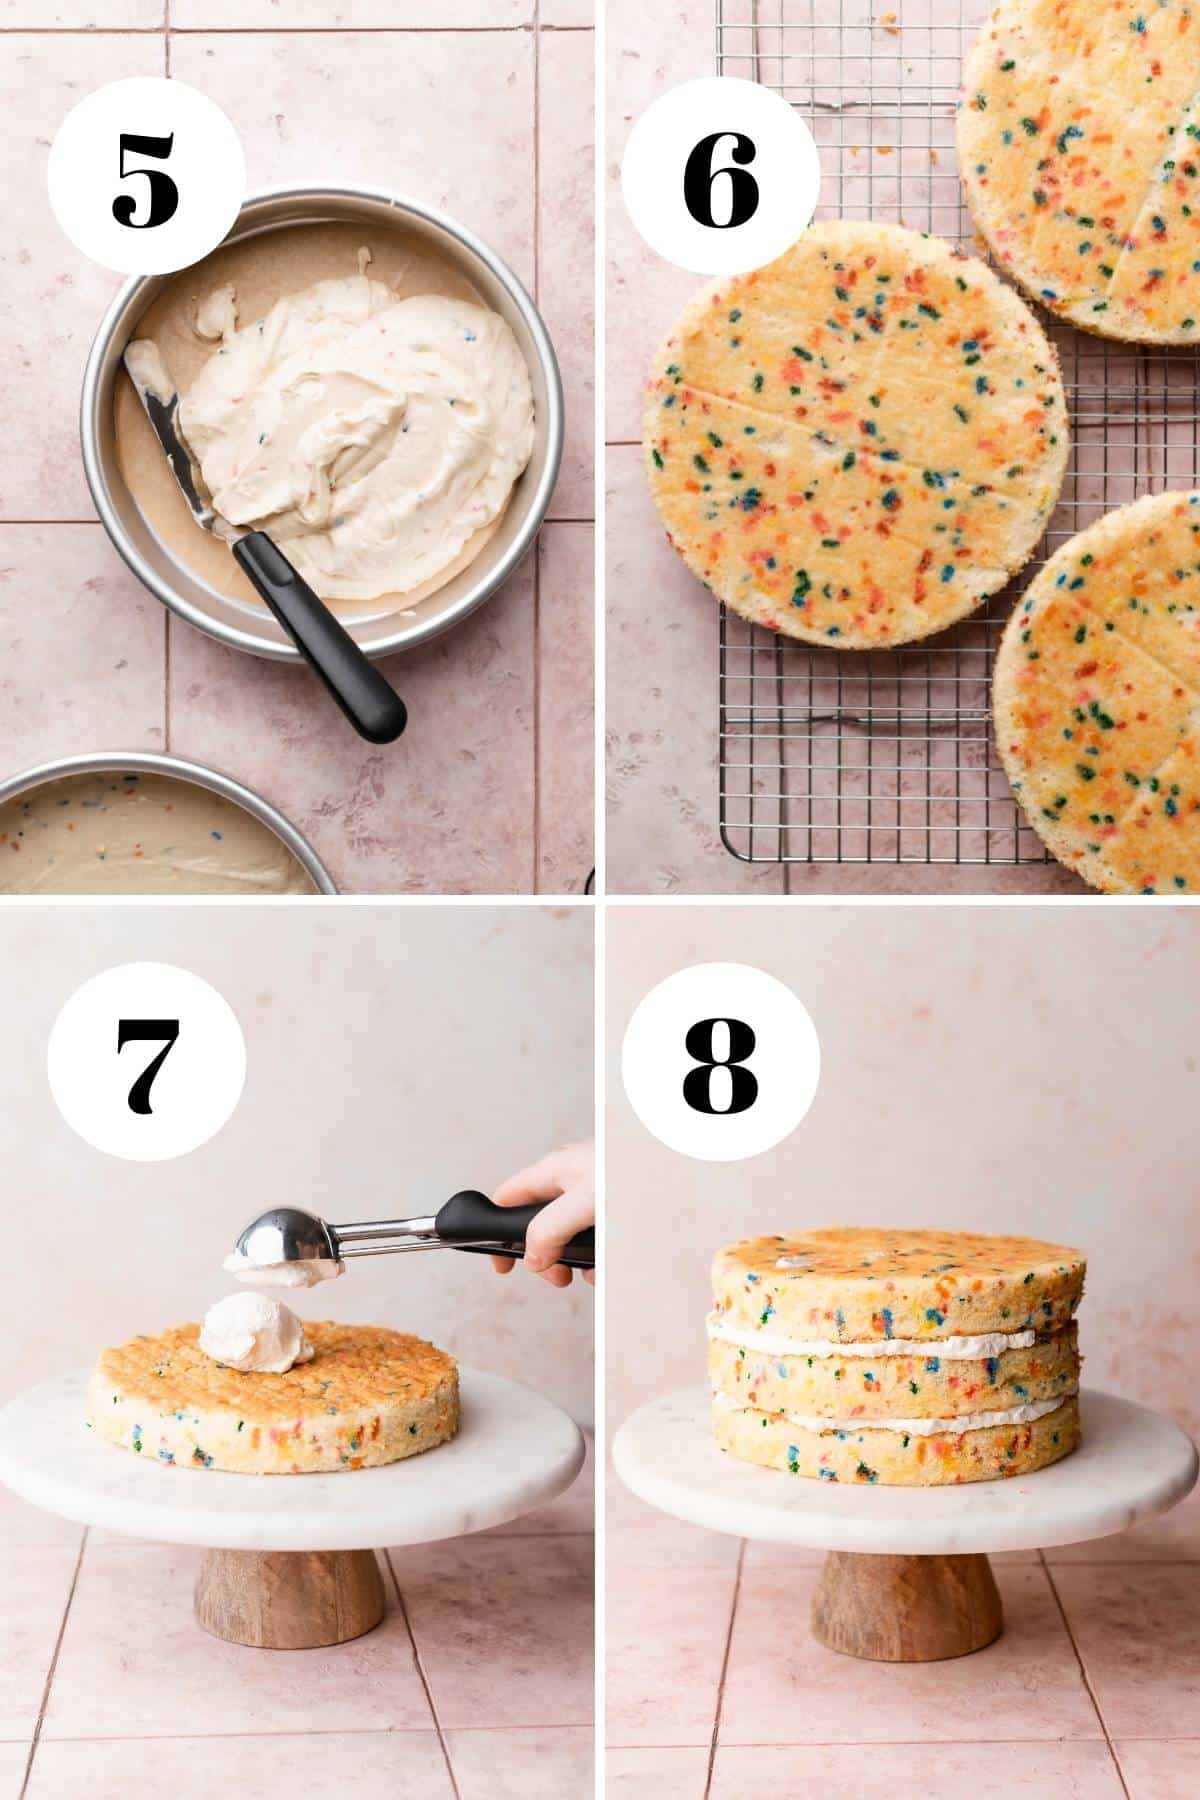
Step 5: Evenly distribute the cake batter into the prepared 8-inch cake pans. I highly recommend using a scale to do this! Each pan should hold about 500 grams of batter. Bake the layers on the middle rack in the oven at 325 F/165 C for about 25 minutes or until the top springs back when touched. You can also use a cake tester or toothpick in the center to check for doneness.
Step 6: Let the cake layers cool on a wire rack for 5 minutes. The cake should start to pull away from the sides of the pan as it cools. Gently knock each layer out and allow them to cool completely on a cooling rack.
Step 7: Place one cake round right side up on a serving platter or cardboard cake round that is at least 1-2 inches wider than the cake. Add about 1/2-2/3 cups of buttercream to the center of the cake and spread it evenly over the top.
Step 8: Add the next layer in the same way. Flip the top cake layer upside down so that the top of the cake is completely flat. Gently press it into the buttercream to secure it, then make sure the cake is level and not lopsided.
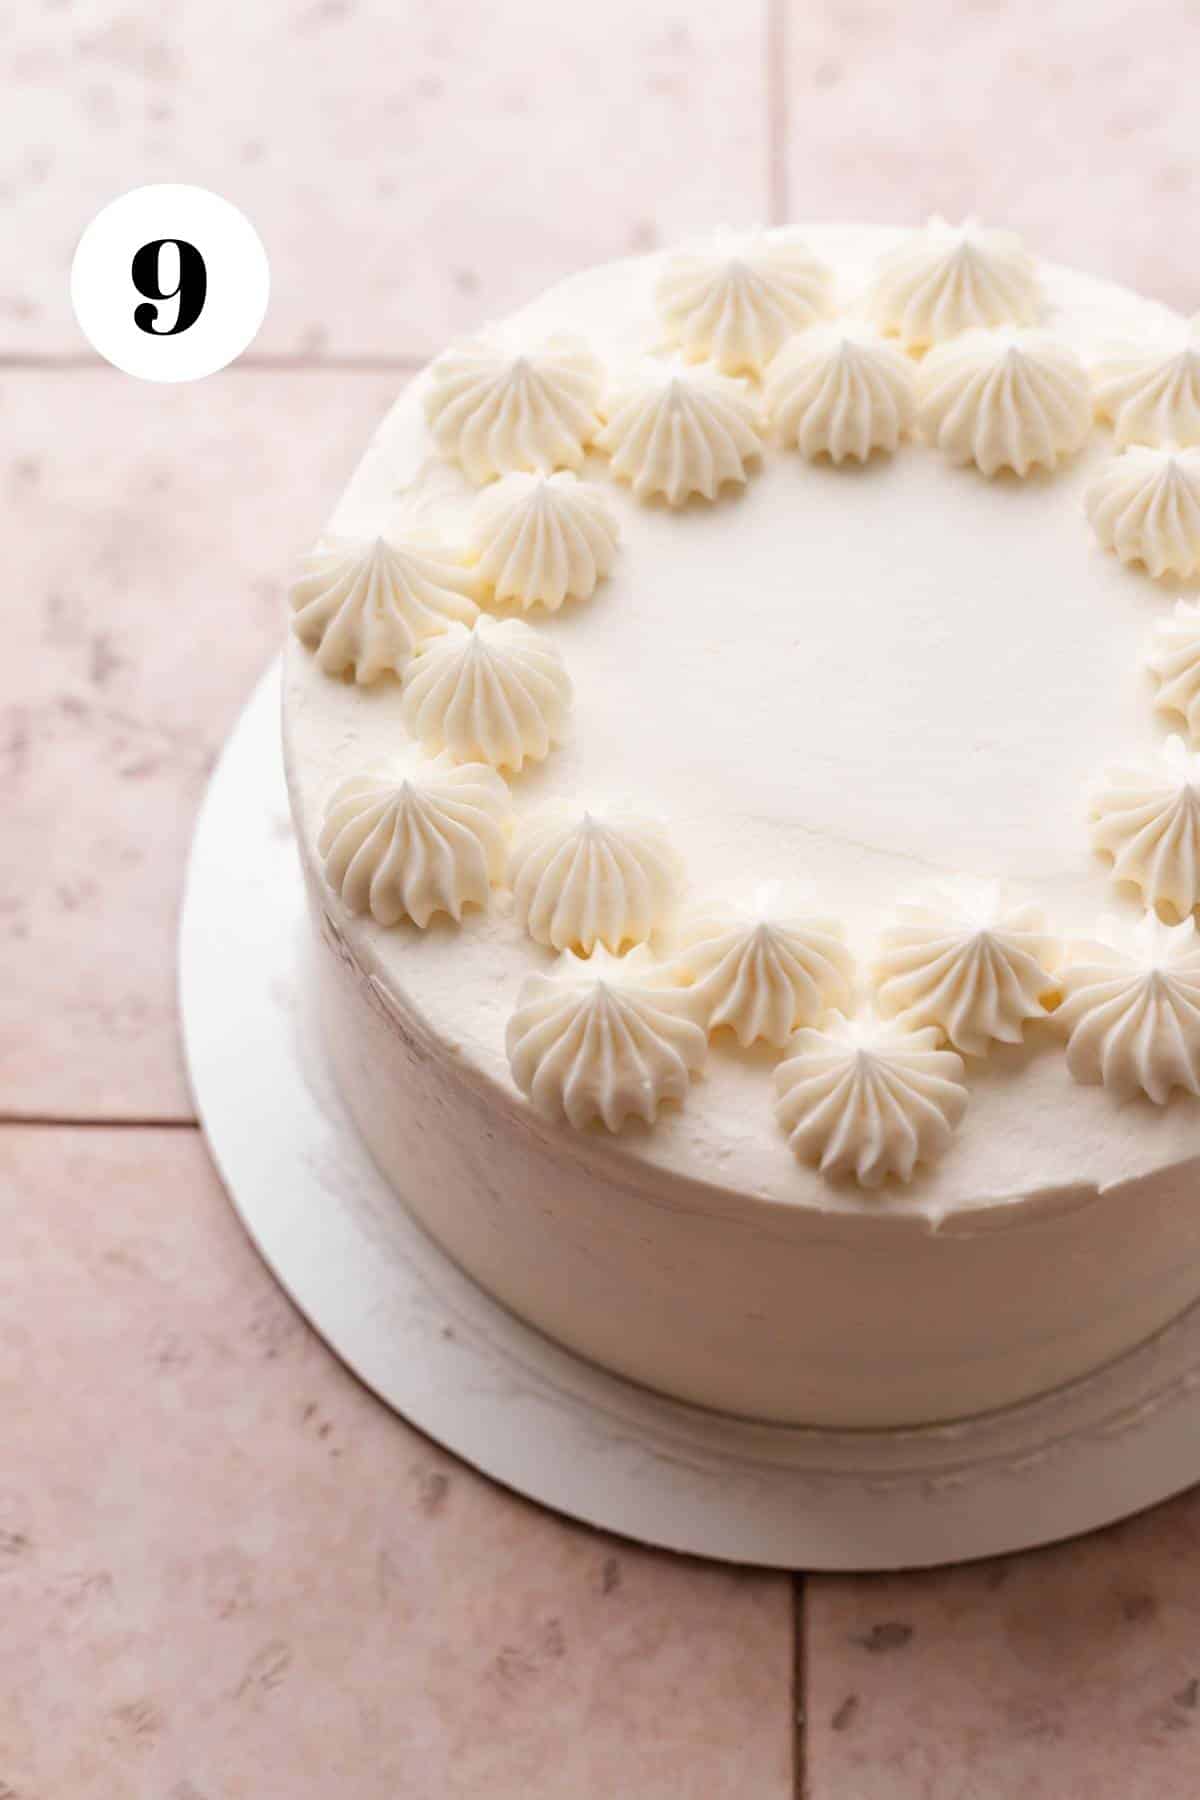
Step 9: Spread a thin coat over the outside of the cake as the crumb coat. Chill the cake in the fridge or freezer until set, then frost the top and sides of the cake with the rest of the buttercream. Pipe dollops of buttercream on the top of the cake, then sprinkle with more rainbow jimmies on top and gently press them into the sides.
storage & freezing instructions
- Fridge: I recommend storing the frosted cake in the fridge, especially in the summer when your home is warm. Once cut, stick a piece of parchment paper to the exposed part to keep it from drying out. If stored properly, the cake will stay fresh and moist for up to one week.
- Freezer: You can freeze both the whole and sliced cake for up to one month in the freezer. If you are storing it whole, I recommend keeping it in a cake carrier or some kind of large container to keep it from getting stale.
- Make ahead: Planning to make the cake ahead of time? Wrap each in plastic wrap and store them in the freezer until you are ready to frost the cake.
faq’s
Unfortunately, you can not substitute the cake flour. I tried making this recipe with regular flour but the cake ends up super crumbly and resembles cornbread!
If you are worried it will stick to the pan, feel free to grease the entire pan and not just the bottom!
Using room temperature ingredients creates a smooth, fully blended batter that results in a uniform texture and even baking.
The cakes are done baking when you top the top and it gently springs back. The cake will also start to pull away from the sides of the pan while baking which is a great indication that they are done!
I have not used this amount of batter to bake a 9-inch cake, but it’s definitely possible! Fill the cake pans just over halfway full to keep them from collapsing in the oven.

8 Inch Vanilla Funetti Cake
Ingredients
cake ingredients
- 1 1/3 cup whole milk
- 1/2 cup canola oil
- 3 2/3 cup cake flour, *SEE NOTES*
- 1 3/4 cups sugar
- 1 tbsp baking powder
- 1/2 tsp kosher salt
- 1 cup unsalted butter, room temperature, cut into cubes
- 1 tbsp vanilla extract
- 3 large eggs, room temperature
- 1/2 cup rainbow jimmy sprinkles
- simple syrup, for brushing the cake layers
vanilla buttercream ingredients
- 2 1/2 cups unsalted butter, room temperature
- 4 1/2 cups powdered sugar
- 2 tsp vanilla extract
- 2 tbsp whole milk
Instructions
making the cakes
- Preheat the oven to 325 degrees F/165 C. Grease the bottoms of the cake pans and then line them with a round of parchment paper.
- In a small bowl, whisk together the oil and about half of the milk.1 1/3 cup (10 ounces) whole milk, 1/2 cup (91 g) canola oil
- Add the flour, sugar, baking powder, and salt to a 5-quart mixing bowl and mix on low with the paddle until combined.3 2/3 cup (370 g) cake flour, 1 3/4 cups (360 g) sugar, 1 tbsp (11 g) baking powder, 1/2 tsp kosher salt
- Add the cubed butter to the mixing bowl and mix on low until it's crumbly and looks like coarse sand.1 cup (226 g) unsalted butter
- With the mixer running on low, stream in the milk and oil mixture.
- Increase to medium speed and mix for exactly 2 minutes.
- Then whisk together the eggs, vanilla, and the rest of the milk.1 tbsp (14 g) vanilla extract, 3 large (150 g) eggs
- With the mixer running on low, slowly stream the egg mixture into the bowl until combined. Scrape down the sides and bottom of the bowl, then mix for another 10-20 seconds until everything is homogenous.
- Add the rainbow sprinkles and fold them gently into the batter with a rubber spatula.1/2 cup (80 g) rainbow jimmy sprinkles
- Evenly distribute the batter into the prepared pans, it's best to do this with a scale. Each pan should have about 500 grams of batter.
- Smooth the batter with a small offset spatula to fill the pans, then bake them for about 25 minutes or until the tops bounce back when touched.
- Let the pans cool for 5 minutes on a cooling rack. The cake should start to pull away from the sides of the pans as they cool. Carefully knock out each layer and then let them cool competely on the rack.
making the buttercream
- In a mixing bowl, mix the soft butter on low for 1 minute until smooth and lump free.2 1/2 cups (565 g) unsalted butter
- Add in half of the powdered sugar and mix on low until combined, then add in the rest of the sugar. Once there is no more dry sugar, increase the speed to high and mix for 5 minutes or until the buttercream is pure white and very fluffy.4 1/2 cups (450 g) powdered sugar
- Then add the milk and vanilla to the bowl and mix on low until combined.2 tsp vanilla extract, 2 tbsp (30 g) whole milk
assembling the cake
- Place the first layer right side up on a serving plate or cardboard cake round that is 1-2 inches wider than the cake.
- Brush the top of the cake layer lightly with some simple syrup.
- Add 1/2-2/3 cup of buttercream on top of the layer and use an offset spatula to evenly smooth it over the top. Continue with the next layer following the same steps as the first.
- Place the last layer upside down so that the top is super flat.
- Frost the entire cake with a very thin layer of buttercream for the crumb coat. This will trap any peices of cake from getting into the final layer of buttercream. Let it chill in the fridge or freezer until the frosting is set.
- Frost the entire cake in a thicker layer of buttercream, leaving some extra for decorating.
- Use a piping bag with a star tip to pipe dollops of buttercream on top of the cake.
- Press more rainbow sprinkles onto the sides and sprinkle them on top of the buttercream dollops.
Notes
- Use a kitchen scale: I highly recommend using a kitchen scale for the most accurate results. If you do not own a scale, make sure to use the spoon measure method!
- Use room temperature ingredients: Using room temperature ingredients creates a smooth, fully blended batter that will result in a uniform texture and even baking.
- Baking time variations: All ovens vary in temperature, I recommend keeping an eye on the layers while they are baking. If you have hot spots in your oven, you should carefully rotate the pans halfway through baking.
- Buttercream: Want a complete funfetti cake? Mix 1/4 cup of sprinkles into the buttercream before frosting. You could also frost it with chocolate buttercream!
- Cake: Want just a plain vanilla cake? Feel free to leave the sprinkles out. For a vanilla bean cake, replace the vanilla extract with vanilla bean paste for even more vanilla flavor.
- Storage: Cut any leftover cake into slices, then place them on a baking tray in the freezer for 10 minutes until solid. Then you can wrap each slice in plastic wrap and either freeze them or keep them in the fridge for later!







soooo moist and fluffy. best recipe i’ve used
So excited to make this this weekend! Couple questions: 1) could I swap extra creamy oat milk (or oat milk/coconut half and half) for dairy milk? 2) is using gel colors okay for this buttercream frosting or would it seize up?
Thank you for all your help?! Love your recipes!
Hi Marissa! I haven’t tested it, but I think oat milk/coconut half-and-half should work fine! And you can definitely use gel colors, just make sure to use a little at a time so you don’t add too much since gel is so concentrated. Let me know if you have any other questions, looking forward to hearing how it turns out! 🙂