Hot Cocoa Cupcakes
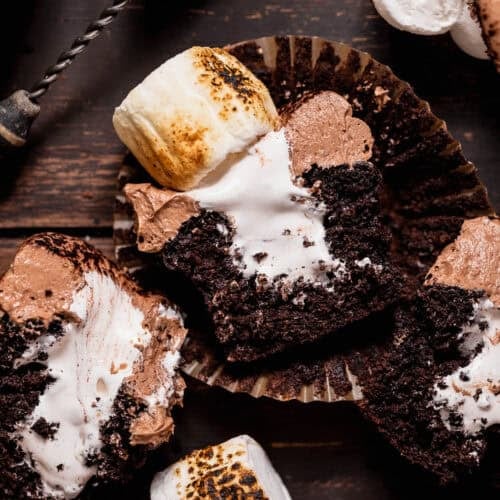
Skip the cookie tray and bring these bakery-worthy hot cocoa cupcakes to your next holiday gathering. Rich chocolate cake, gooey marshmallow filling, and toasted marshmallows on top make them look bakery-bought—but they're all homemade, and guaranteed to impress!
Ingredients
For the Chocolate Cupcake Batter
- 1 cup + 2 tablespoons unbleached cake flour *See notes below for measuring*
- 3/4 cups granulated sugar
- 2/3 cup unsweetened Dutch processed cocoa powder
- 1/4 cup brown sugar packed
- 1 teaspoon espresso powder optional
- 1/2 teaspoon baking powder
- 1/4 teaspoon baking soda
- 1/2 teaspoon fine sea salt
- 8 tablespoons cubed unsalted butter room temperature
- 1/2 cup sour cream room temperature
- 1/4 cup whole milk room temperature
- 1/4 cup vegetable oil
- 1 large egg room temperature
- 1 large egg yolk room temperature
- 1 teaspoon vanilla extract
- 1/4 cup room temperature coffeee or water
For the Marshmallow Filling
- 1/2 cup granulated sugar
- 1/2 cup honey agave, or corn syrup
- 1/4 cup water
- 2 large egg whites room temperature
- 1/4 teaspoon cream of tartar
- 1 teaspoon vanilla bean paste or extract
For the Milk Chocolate Frosting
- 1 1/2 cup unsalted butter room temperature
- 2 cups powdered sugar
- 4 tablespoons cocoa powder sifted
- 2 tablespoons heavy cream
- Pinch of fine sea salt
Instructions
Make the Cupcakes
- Preheat the oven to 350°F(180°C). Line a 12-cup cupcake pan with liners and set aside
- In the bowl of a stand mixer, combine the cake flour, sugar, cocoa powder, brown sugar, espresso powder, baking powder, baking soda, and salt. Use the paddle attachment to mix in the butter until it resembles coarse sand, about 3 minutes on low speed.
- In a separate bowl, whisk together the sour cream, milk, oil, egg, egg yolk, vanilla, and coffee. Pour this mixture into the bowl and mix on low speed for a few seconds until just combined. Scrape the bottom of the bowl to get any dry spots, do not overmix!
- Fill the cupcake liners with the batter, each one will be roughly 3/4 full. You will have enough batter for 12 cupcakes.
- Bake for 18-20 minutes, or until a toothpick inserted into the centers comes out covered in a few moist crumbs. Once baked, let the pan cool on a wire rack for 10 minutes. Then, carefully remove them from the hot pan and let them finish cooling directly on the rack while you make the filling.
Make the Marshmallow Filling
- Place water, sugar, and honey in a medium saucepan. Stir to combine. Insert a candy thermometer into the pot and heat over medium-high. Do not stir from this point on, or crystals will form.
- Place the egg whites and cream of tartar in the bowl of a stand mixer and start mixing them on low speed. When the syrup reaches 225°F(107°C), increase the mixer speed to medium to whip to soft peaks.
- When the sugar syrup reaches 238°F(114°C), remove the pan from the heat. Very slowly and carefully pour the sugar syrup into the whipping bowl of whites in between the side of the bowl and the whisk in a thin, steady stream. Try not to hit the whisk, or it will splatter the syrup on the sides of the bowl.
- Once all of the syrup has been added, turn the mixer up to high speed and continue whipping for about 7-8 minutes, or until the mixture is thick and fluffy.
- Add the vanilla and whip until combined, then transfer to a bowl, cover with plastic wrap, and set aside until ready to use.
Make the Milk Chocolate Frosting
- In the bowl of a stand mixer, cream the butter until smooth, then mix in the powdered sugar. Beat on medium speed until light and fluffy, then mix in the cocoa powder, heavy cream, and salt until combined.
Assembly
- Place the cupcakes back into the pan (it’s easier to core the centers this way). Then use an apple corer or a knife to remove the center of the cupcakes. You want to remove a little more than half; just don't go too far down, or the cupcakes will split in half!
- Then, transfer the cored cupcakes to a baking pan.
- Fill one piping bag with the marshmallow fluff and a second bag with the milk chocolate frosting.
- Pipe the marshmallow fluff into the center of the cupcakes, then pipe a tire ring of buttercream around the filled center.
- Then, go back with the marshmallow bag and fill the centers to the top of the tire ring of frosting.
- Dust the tops of the cupcake with cocoa powder (optional) and garnish with toasted marshmallows. Enjoy!
Notes
*Measure your dry ingredients properly. This is my #1 baking tip! Never scoop a measuring cup into your flour, as this always leads to using too much flour. Instead, use the spoon-level method. This means fluffing the flour first, then spooning it into your measuring cup/spoon. For the BEST results, use a kitchen scale!*
Storage: Keep leftover cupcakes in an airtight container at room temperature for up to 3 days.
This homemade marshmallow fluff makes a generous batch; you’ll only need about half for the cupcakes. Save the rest for spooning onto hot cocoa, swirling into brownies, or using as the filling in hot cocoa cookies!
